Services on Demand
Journal
Article
Indicators
-
 Cited by SciELO
 -
 Access statistics
Related links
-
 Cited by Google
 -
 Similars in
SciELO
 -
 Similars in Google
Share
DYNA
Print version ISSN 0012-7353
Dyna rev.fac.nac.minas vol.82 no.191 Medellín May/June 2015
https://doi.org/10.15446/dyna.v82n191.43292
DOI: http://dx.doi.org/10.15446/dyna.v82n191.43292
CrN coatings deposited by magnetron sputtering: Mechanical and tribological properties
Recubrimientos de CrN depositados por pulverización catódica con magnetrón: Propiedades mecánicas y tribológicas
Alexander Ruden-Muñoz a, Elisabeth Restrepo-Parra b & Federico Sequeda b
a Departamento de Matemáticas, Universidad Tecnológica de Pereira, Pereira, Colombia. arudenm@gmail.co
b Facultad de Ciencias Exactas y Naturales, Universidad Nacional de Colombia, Manizales, Colombia. erestrepopa@unal.edu.co
c Laboratorio RDAI, Escuela de Ingeniería de Materiales, Universidad del Valle, Cali, Colombia. fsequeda@yahoo.com
Received: May 3th, 2014. Received in revised form: January 16th, 2015. Accepted: March 18th, 2015.
This work is licensed under a Creative Commons Attribution-NonCommercial-NoDerivatives 4.0 International License.

Abstract
Mechanical and tribological properties of CrN coatings grown on steel substrates AISI 304 and AISI 4140 using the magnetron sputtering technique were analyzed. Coatings were grown at two pressures of work, 0.4 and 4.0 Pa. The films grown on AISI 304 at a pressure of work of 0.4 showed the highest hardness because they presented a larger grain size and lower roughness. For CrN synthesized at 0.4 Pa, the surface damage was lower during the tribological test. Adherence studies were also carried out, obtaining Lc1 and Lc2 for coatings produced at both pressures and on both substrates. Better adherence behavior was observed for films grown at a low pressure because these films were thicker (~890 nm).
Keywords: hardness, tribology, critical load, adherence.
Resumen
Se analizaron las propiedades mecánicas y tribológicas de recubrimientos de CrN crecidos sobre sutratos de aceros AISI 203 y AISI 4140 usando la técnica de pulverización catódica con magnetrón. Los recubrimietos fueron crecidos a dos presiones de trabajo, 0.4 y 4.0 Pa. Las películas crecidas sobre acero AISI 304 a 0.4 Pa mostraron la dureza más alta debido a que ésta presenta gran tamaño de grano y baja rugosidad. Para los recubrimientos sinterizados a o.4 Pa, el daño superficial fue bajo durante la prueba tribológica. Se realizaron estudios de adherencia, obteniéndose Lc1 y Lc2 para los recubrimietos producidos con ambas presiones y en abos sustratos. Se observó una mejor adherencia en las películas crecidas a baja presión debido a su mayor espesor (~890 nm).
Palabras clave: dureza, tribología, carga críticia, aderencia.
1. Introduction
Over the past decades, hard coatings produced by physical vapor deposition have been successfully applied to molds, punches, cutting tools and other machine parts to increase their lifetime. The current interest in hard coatings has focused on nanostructured coatings with high hardness [1-3]. One of the most interesting materials is chromium nitride (CrNx) produced as thin films. CrN has been used extensively in industry due to its excellent mechanical properties [4,5], corrosion resistance [6,7] and excellent wear behavior [8,9]. CrNx coatings are found in cutlery, parts used in the aeronautical and textile industries as well as cutting tools and dyes. In recent years, CrNx films have also replaced hard chromium in specific applications in the automotive industry [10]. Among the advantages of CrNx coatings are a small coefficient of friction, low internal stresses and the possibility of producing thick coatings. Due to its exceptional abrasion resistance, chrome nitride is used as a coating in cutting, milling and screw-threading tools made of titanium and its alloys, brass, copper and other non-ferrous metals, molds, punches and machine parts. Chrome nitride shows high chemical resistance and exceptionally low affinity to machined non-ferrous metals [11,12]. Regarding their tribological behavior, CrN coatings have been reported to exhibit improved wear resistance under dry and lubricated conditions when compared to TiN films [13]. Moreover, CrN coatings exhibit sufficient thermal stability and wear and corrosion resistance and are considered to be a promising hard coating material [14,15] in addition to conventionally used TiN.
CrN hard coatings are widely used due to their excellent mechanical properties, which make them useful in a wide variety of industrial applications. However, in spite of their excellent mechanical and tribological properties, their corrosion resistance has always been conditioned by the presence of structural defects such as pores, pinholes and cracks that appear during application [16-18]. The presence of these defects is a key factor that influences the integrity of such coatings, not only in terms of corrosion resistance but also tribological properties [19]. Moreover, whenprepared as a nanocomposite combined with other materials, such as WS2, CrN can be used as a solid lubricant coating [20]
In this work, a study on the mechanical and tribological properties of CrN coatings grown at two pressures on AISI 304 and AISI 4140 substrates was performed. Coatings were produced by the magnetron sputtering technique. Mechanical properties were analyzed by using the nanoindentation technique, and tribological behavior was studied by the ball-on-disk method.
2. Experimental setup
A DC magnetron sputtering system located in a clean room was employed, and the base vacuum pressure was 5x10⁻⁷ Pa. Coatings were grown by using a Cr target (99.99%) at room temperature, a bias voltage of -300 V, an interelectrode distance of 10 cm and two pressures of work (P1=0.4 Pa and P2=4 Pa) using a gas mixture of N2-Ar (1.5:10 sccm) for both cases, the pressure, and relationships of flow were monitored and remained constant during the entire experiment. The power of the system was 8 W/m2 for 90 min. Two substrates were chosen to produce the coatings. Austenitic AISI 304 steel has one of the highest corrosion resistances among other Cr-Ni (carbon-stabilized) -based steels when it is exposed to harmful environments [21]. AISI - SAE 4140 is a Cr-Mo alloyed steel with high stability up to 400°C and suitable for resisting stress and torsion [22]. The sample dimensions were a diameter of 1.25 cm and thickness of 4 mm. Samples were polished using silicon carbide abrasive paper. The samples were then deep cleaned using an ultrasonic cube in acetone for 15 min to eliminate oil, dust and any other contaminants.
XRD analysis was carried out using a D8 Bruker AXS diffractometer with the Rigaku Ultima III software and Cu Ka radiation (l=0.1540 nm). The hardness and elastic moduli were obtained using a nanoindenter NANOVEA module IBIS - Technology, employing the traditional Oliver and Pharr method [23] to fit the discharge curve with a load resolution of 0.08 µN. Nanoindentations were carried out at low (Lo), medium (Me) and high (Hi) loads (Lo: 0.01 - 0.4 mN; Me: 0.41 - 1 mN and Hi: 1.1 - 10 mN), obtaining hardness profiles and elastic moduli as a function of depth. An ideal load of 1 mN was determined to obtain the maximum indentation depth of 10% of the coating thickness. The phenomenon known as the indentation size effect (ISE) usually involves a decrease in the measured apparent hardness with increasing applied test load, i.e., with increasing indentation size. The existence of the ISE suggests that, if hardness is used as a material selection criterion, it is clearly insufficient to quote a single hardness number [24]. Nanoindentation tests were performed using a pyramidal Berkovich indenter coupled to a Fischer-Cripps Laboratories IBIS Nanoindentation Tester and a displacement control with a compliance of 0.00035 µm/mN. The IBIS software was used to control the indentation and for correction and results analysis.
A ball-on-disk (BOD) CSEM - Tribometer was used to determine the wear and coefficient of friction (COF) of the coatings. A spherical counterpair of alumina (Al2O3) with a diameter of 6 mm, normal load of 1 N, sliding distance of 100 m, velocity of 10 m /s and data acquisition rate of 2 Hz was used. The COF was obtained by using the XTribo 2.5 software program. To calculate the thickness, roughness and wear of the samples, an XP - 2 AMBIOS profilometer was employed. The wear rate measurements were carried out using the cross section of the wear track after the BOD test and the Archard model, which proposes that the wear coefficient is directly proportional to the wear volume and inversely proportional to the normal applied load and the sliding distance.
A scratch test for measuring the adherence was carried out with a Micro Test instrument using a Rockwell C indenter with a radius of 200 mm, a variable load between 0 and 100 N, an applied load velocity of 1 N/s, a distance of 6 mm and a displacement velocity of 4.5 mm/min. the software of the equipment allows for the calculation of COF versus load and distance, which is used to obtain the critical load (LC) for coating failure and thus to determine the failure type (adhesive or cohesive).
3. Results and Discussion
3.1. Structure and Morphology
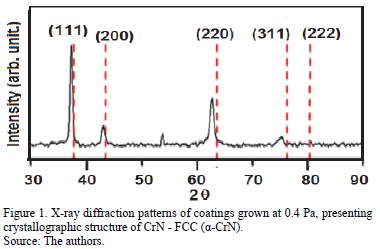
A XRD study of CrN films was carried at an Ar-N2 flux ratio of 10/1.5 sccm. Fig. 1 shows the XRD results for the CrN coatings grown at 0.4 Pa. The diffraction results show peaks corresponding to the (111), (220), (200), (311) and (222) planes of the FCC phase. These orientations are in agreement with ICDD JCPDS card 00-011-0065 for CrN. These results are in agreement with studies carried out by Hones et al. [25]. The diffraction patterns show a preferential orientation in the direction of (111), characteristic of the FCC CrN phase [26,27]. Peak identification was carried out by using the crystalline structure database of the ICSD [28].
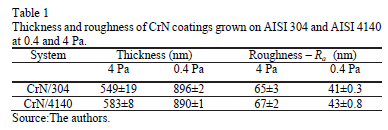
Using profilometry analysis, the thickness of the coatings deposited on AISI 304 and AISI 4140 at 0.4 and 4 Pa were obtained, and the values are listed in Table 1.
Changes in the thickness of the coatings depending not only on the substrate but also on the pressure of work were observed. Thinner coatings were obtained when grown at a pressure of 4 Pa because of the increase in the number of collisions between molecules during deposition. This increase forces atoms to lose energy before arriving to the substrate, decreasing the island coalescence process and generating a high porosity [29]. At lower pressures, nucleation is enhanced, producing densified and uniform coatings [30]. No strong influence of the substrate material on the coating thickness was observed. Table 1 also shows the coatings' roughness. At a higher pressure, the roughness increases due to a greater number of collisions in the plasma, which reduces the atomic energy and mobility of surface adatoms; again the coalescence process is not favored. Moreover, the ionization degree (also enhanced by a great number of collisions) [31] allows for a greater range of atomic energies, increasing the probability of forming several structures such as Cr, Cr2N and CrN (nanocomposite) with denser regions than others [32]. At a lower pressure, atoms arrive with higher energy, enhancing the coalescence process.
According to Zhao et al. [33], as the pressure increases, the deposition rate decreases; thus, the energy and the number of negative particles decrease because of the increase in the dispersion of atoms. Conversely, at lower pressures (less than 10 mTorr), the deposition rate is affected by the strong bombardment of negatively charged particles, producing denser and low-roughness films, as was the case for the films grown at 0.4 Pa. At intermediate pressures (between 10 and 30 mTorr), the bombardment of negatively charged particles is not sufficiently high to reduce the surface roughness due to the deposition rate. Finally, at extremely high pressures, (greater than 80 mTorr) and low deposition rates, new species arriving to the surface have more time to relax into configurations with lower energy, allowing for the formation of low-roughness films.
3.2. Mechanical properties
Mechanical tests were carried out on AISI 304 and AISI4140 substrates with and without CrN coatings at both pressures of work. The Oliver and Parr method was employed [34, 35] using load -unload curves to determine the materials' hardness (H) and Young's moduli (E).
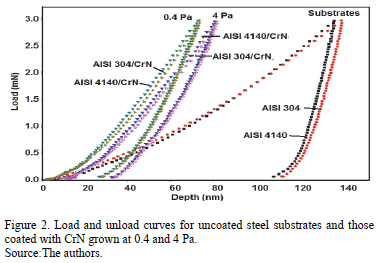
Fig. 2 shows the load-unload curves for the substrates with and without CrN coatings deposited at 0.4 and 4 Pa. The substrates presented a strong elastic behavior according to the wide range of deformation with poor contact stiffness they experienced [36]. Conversely, when the substrates were coated with CrN at two different pressures, the nanoindentation curves indicated elasto-plastic behavior, and there was no piling around the indenter [37].
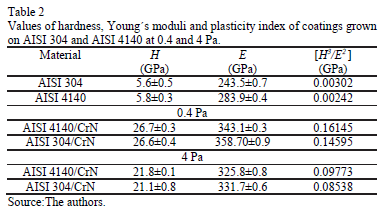
Table 2 shows the H, E and the shear resistance (H3/E2) for the coatings grown on AISI 304 and AISI 4140 at both work pressures. The H value of the coating grown at 0.4 Pa is on the order of 26 GPa, demonstrating that the hardness is independent of the substrate type if the depth penetration is small enough to avoid the size indentation effect [24], which is considered to be 10% of the film thickness [38]. Conversely, the coatings deposited at 4 Pa exhibited lower hardness (21 GPa) than those grown at 0.4 Pa. By invoking the Hall-Petch effect [39,40], the coating hardness was related to the grain size and thereby with the roughness. Coatings presenting lower grain size and roughness (sample grown at 0.4 Pa) presented higher hardness because they exhibited better surface properties. According to Ward and Datta [41], the hardness of Nb coatings is strongly related to transitions in failure modes when such films are submitted to scratch tests and morphological modifications. In this study high-density coatings were produced, with the coatings grown at 0.4 Pa exhibiting smaller grains and lower roughness with increasing hardness. By contrast, the coatings grown at 4 Pa presented high porosity with large grains and high roughness. Regarding the elasticity, there several changes were observed as a function of the substrate type and the pressure. An increase in the shear resistance at a low pressure of work (0.4 Pa) occurred because the probability of island coalescence was greater; thus, coatings presented a preferential orientation along the (111) crystallographic direction, which is the direction of the most densely packed planes, thereby increasing the surface hardness due to plastic deformation [42]. However, in the coating deposited at 4 Pa, the lower degree of coalescence led to low crystallographic texture and higher polycrystallinity, increasing the number of grain boundaries due to different formation energies [43].
3.3. Tribological analysis
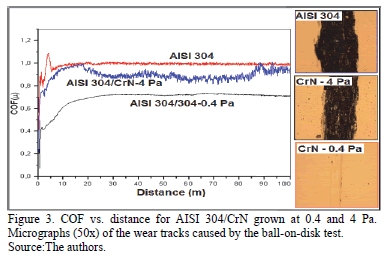
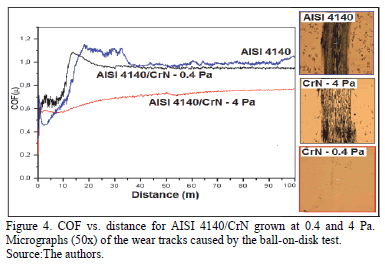
Figs. 3 and 4 present the results of the coefficient of friction (COF) analysis of the CrN films. From this analysis, the coefficient of wear was obtained by the profilometry technique. Both substrates, AISI 304 and AISI 4140, showed high COFs because of the formation of abrasive wear particles; moreover, micro-welding was observed during the ball-on-disk process [44]. In most of the cases presented here, during the initial ramping, the friction fluctuated. This was due to the interaction of the coatings and the ball material. Initially, m increased to a peak value and then gradually decreased to a lower, stable value. The high initial COF was due to the adhesive wear that took place between the ball and the sample, which led to the transfer of material from the ball to the coating surface. The friction decreased as the material transfer from the ball stabilized after a large area of the coated sample was covered with the transferred material from the ball. After a certain period, this transferred material covered the entire test area, and abrasive wear took place. The stabilized coefficient friction increased after some time as the test progressed. In the steady state, the transferred material was worn out slowly by abrasive removal as the wear test progressed [45].
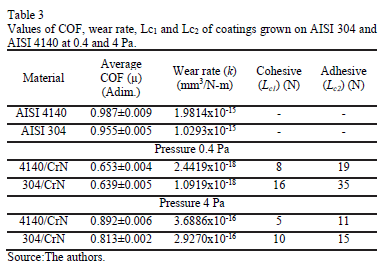
In Table 3, the COFs of the coatings studied in this work are presented. The CrN/304 and CrN/4140 systems grown at 4.0 Pa showed a rapid increase in the COF. This increase occurred because the particles could not anchor themselves, generating an abrasive system composed of particles that were hardened and plastically deformed. Moreover, rapid delamination occurred due to poor island coalescence. Conversely, the coatings produced at 0.4 Pa on both substrates presented stable COFs with value on the order of 0.646. Similar results have been reported by Feng Cai et al. for a-CrN [46]. Micrographs of the wear track (50x) for each tribological process show surface damage following the wear analysis. The steel substrates exhibited abrasive damage and micro-welding, while the coatings deposited at 4 Pa showed tribological damage with surface fatigue. This damage was caused by poor island coalescence, producing high porosity, delamination and the fracture of asperities, which produced plowing and greater surface damage due to plastic deformation. For the CrN synthesized at 0.4 Pa, the surface damage was lower because of the high densification of the film caused by high adatom mobility and lower roughness. The surface damage produced by the tribological test consisted of surface plowing [47].
In Table 3, the coefficient of wear or wear rate, k, measured by using the cross section of the wear track (profilometry analysis) obtained by the ball-on-disk test is shown. The coefficients were calculated by considering the wear volume (V) using the theorem of Pappus (eq. 1) and the formulation of Archard (eq. 2).

Where A is the apparent contact area and  is an average height corresponding to the material removal.

L being the sliding distance, P the applied load and H the hardness. All systems presented abrasive characteristics. When CrN coatings were produced at 0.4 Pa, the wear rate decreased, presenting damage up to 10000 times lower than that observed for the uncoated substrates (AISI 304 and AISI 4140). However, for the coatings grown at 4 Pa, the wear rate decreased by approximately 1000 times.
3.4. Adherence analysis - Scratch test
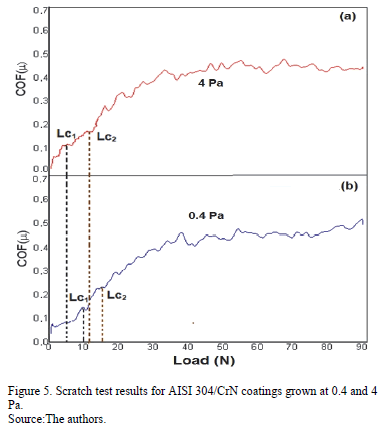
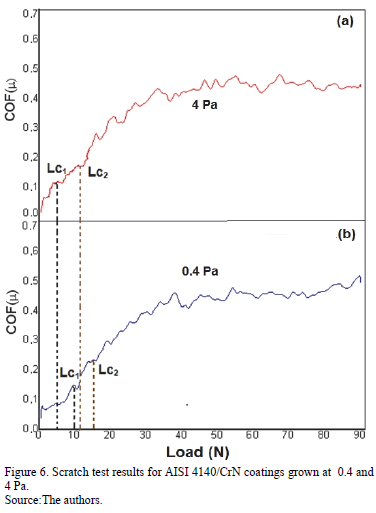
Figs. 5 and 6 show the results of the scratch test analysis of all of the samples studied in this work. In these figures, the critical loads (in N) of the Lc1 and Lc2 failures, respectively, are presented.
These values were obtained from the zone where the load became independent of the COF. These two critical loads Lc1 and Lc2 were defined for the failure of the coatings. Lc1, the first critical load, corresponds to the initial cohesive failure of the coatings, characterized by the appearance of initial cracks or pores within the coatings. Lc2, the second critical load, corresponds to the adhesive failure of the coatings, i.e., the first observation of adhesive failure features such as chipping, partial delamination, pores or other such phenomena, through which the substrate beneath the coating becomes exposed [45,48]. The values of such loads are listed in Table 3. Better adherence behavior was observed for films grown at low pressure, especially those grown on AISI 304 because they were thicker (~890 nm) and exhibited higher volume displacement and thus improved surface adherence.
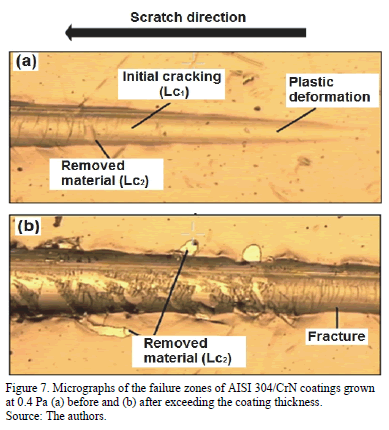
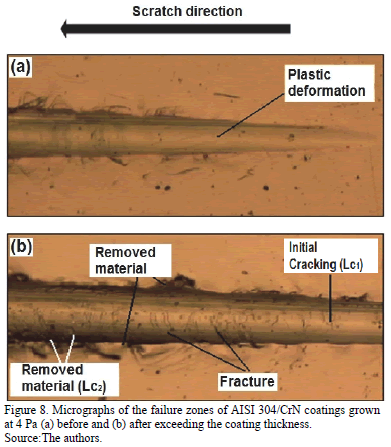
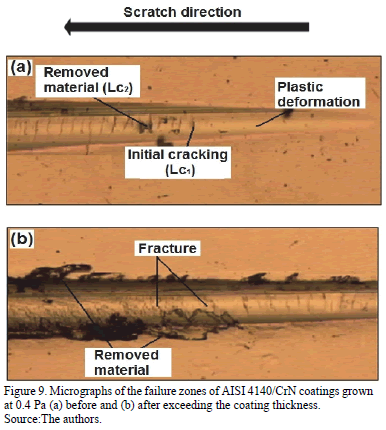
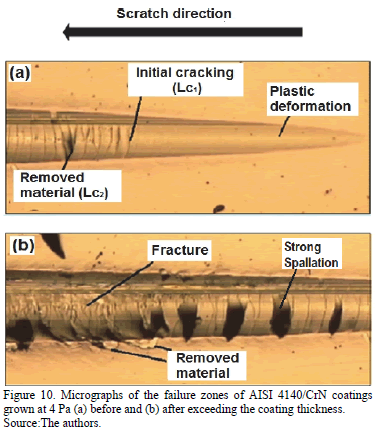
During the dynamic scratching test, some effects on the coatings could be observed. Figs.7 and 8 show that higher damage caused by delamination was sustained by the coatings deposited on AISI 304, while the CrN coatings grown on AISI 4140 underwent cracking (Figs. 9 and 10); thus, three zones can be identified in the scratch test process: (i) plastic deformation zone, (ii) cracking at Lc1 and (iii) delamination and abrasive failure of the coating/substrate (Lc2). The relationship between wear and adhesion has been studied. This correlation is poor when focusing on a small group of data individually. Because many factors will affect the test results, especially those of wear tests, such as deformation and temperature, variation in the data is expected and acceptable [49].
Because changes in the coatings or any other experimental factors will affect the results, the range of variation may be different in other cases. For instance, in our case, we did not have sufficiently high variation in the parameters to obtain a real relationship. However, some conclusions can be drawn.
To explain why the wear rate decreased with the critical adhesion load, wear track images may be considered. Fig. 7 and 8 show the wear tracks of the films grown on AISI 304 at 0.4 and 4 Pa, respectively. When we compare Figs. 7 to 10, a few different failure modes of the wear tracks can be observed, such as spallation and some cracking. For instance, Fig. 7 (AISI 304/CrN grown at 0.4 Pa) shows an image of the coating that sustained the lowest degree of failure and thereby presented the highest adhesion loads. Conversely, Fig. 10 (AISI 4140/CrN grown at 4 Pa) shows an image of the coating that sustained the highest degree of failure and thereby presented the lowest adhesion loads. In all of the wear tracks, similar failure modes were detected; the only difference was that the AISI 4140/CrN coatings grown at 4 Pa exhibited more serious damage. Therefore, it can be concluded that the failure modes due to wear were mainly caused by weak adhesion strength, which accelerated the wear of the films. The adhesion results indicate that the AISI 304/CrN coating grown at 0.4 Pa (Fig. 7) exhibited the best adhesion. In addition, failure due to weak adhesion increased the amount of wear debris generated (AISI 4140/CrN coatings grown at 4 Pa, Fig. 10), which increased the probability of adhesive wear between the coatings and wear debris.
On the other hand, the tribological behavior of coatings was strongly dependent on the coating thickness, especially at relatively low loads; changes in the microstructure and mechanical behavior caused by variations in coating thickness strongly influences their tribological properties [50]. In our case, coatings produced at 0.4 Pa of pressure exhibited higher thickness compared with those produced at 4 Pa. Furthermore, coatings produced at lower pressure presented better tribological behaviour (lower COF and wear rate). According to the literature, if coatings could be produced with relatively high thickness, they can exhibit uniform microstructure and a low residual stress state and their tribological performance can be enhanced [50].
4. Conclusions
The mechanical and tribological properties of CrN coatings grown on steel substrates AISI 304 and AISI 4140 at 0.4 and 4 Pa using the magnetron sputtering technique were analyzed. XRD analysis shows peaks corresponding to the (111), (220), (200), (311) and (222) planes of the FCC phase. Thinner films were obtained when the coatings were grown at a pressure of 4 Pa; however, no strong influence of the substrate material on the coating thickness was observed. Conversely, at a higher pressure, the roughness increased due to low mobility of the surface adatoms. Moreover, the coatings deposited at 4 Pa exhibited lower hardness (21 GPa) than that of the coatings grown at 0.4 Pa. Regarding the wear behavior, both substrates, AISI 304 and AISI 4140, showed high COFs. Moreover, micro-welding was observed during ball-on-disk testing. The CrN/304 and CrN/4140 coatings grown at 4.0 Pa showed a fast increase in the COF. Conversely, the coatings grown at 0.4 Pa on both substrates presented a stable COF on the order of 0.646. The steel substrates presented abrasive damage and micro-welding, while the coatings deposited at 4 Pa showed tribological damage with surface fatigue. For the CrN coating synthesized at 0.4 Pa, the surface damage was lower due to the higher densification of the film. Better adherence behavior was observed for films grown at low pressure, especially those grown AISI 304, because they were thicker (~890 nm) and exhibited higher volume displacement and had improved surface adherence.
Acknowledgments
The authors gratefully acknowledge the financial support of la Dirección Nacional de Investigaciones of the National University during the course of this research under project 10709 "Implementación de técnicas de Modelamiento, Procesamiento Digital y simulación para el estudio de sistemas físicos".
References
[1] Aperador-Chaparro W., Ramírez-Martín C. and Vera-López E., Synergy between erosion-corrosion of steel aisi 4140 covered by a multilayer TiCN/ TiNbCN, at an impact angle of 90°, DYNA, 80 (178), pp. 101-108, 2013. [ Links ]
[2] Holubar, P., Jilek, M. and Sima, M., Present and possible future applications of superhard nanocomposite coatings, Surface Coatings Technology, 133 (1), pp. 145-151, 2000. DOI: 10.1016/S0257-8972(00)00956-7 [ Links ]
[3] Chen, X., Kirsch, B.L., Senter, R., Tolbert, S.H. and Gupta, V., Tensile testing of thin films supported on compliant substrates, Mechanics Materials, 41, pp. 839-848, 2009. DOI: 10.1016/j.mechmat.2009.02.003. [ Links ]
[4] Escobar-Galindo R, van Veen. A, Schut. H, Janssen. G.C.A.M., Hoy. R. and de Hosson, J.Th.M., Adhesion behavior of CrNx coatings on pre-treated metal substrates studied in situ by PBA and ESEM after annealing, Surface and Coatings Technolology, 199 (1), pp. 57-65, 2005. DOI: 10.1016/j.surfcoat.2005.04.018 [ Links ]
[5] Choi, E.Y., Kang, M.Ch., Kwon, D.H., Shin, D.W. and Kim, K.H., Comparative studies on microstructure and mechanical properties of CrN, Cr-C-N and Cr-Mo-N coatings, Journal of Materials Procesisng Technology, 187, pp. 566-570, 2007. DOI: 10.1016/j.jmatprotec.2006.11.090. [ Links ]
[6] Ürgen, M. and Cakir, A.F., The effect of heating on corrosion behavior of TiN- and CrN-coated steels, Surface and Coatings Technology, 96 (2-3), pp. 236-244, 1997. DOI: 10.1016/S0257-8972(97)00123-0 [ Links ]
[7] Lai, F.D. and Wu, J.K., High temperature and corrosion properties of cathodic-arc-plasma-deposited CrN coatings, Surface and Coatings Technology, 64 (1), pp. 53-57, 1994. DOI: 10.1016/S0257-8972(09)90086-X [ Links ]
[8] Dobrzański, L.A. and Lukaszkowicz, K., Erosion resistance and tribological properties of coatings deposited by reactive magnetron sputtering method onto the brass substrate, Journal of Materials Procesing Technology, 157, pp. 317-323, 2004. DOI: 10.1016/j.jmatprotec.2004.09.050. [ Links ]
[9] Gahlin, R., Bromark, M., Hedenqvist, P., Hogmark, S. and Hakansson, G., Properties of TiN and CrN coatings deposited at low temperature using reactive arc-evaporation, Surface and Coatings Technology, 76, pp. 174-180, 1995. DOI: 10.1016/0257-8972(95)02597-9. [ Links ]
[10] Friedrich, C., Berg, G., Broszeit, E., Rick, F. and Holland, J., PVD CrxN coatings for tribological application on piston rings, Surface and Coatings Technology, 97, pp. 661-668, 1997. DOI: 10.1016/S0257-8972(97)00335-6. [ Links ]
[11] Aouadi, S.M., Schultze, D.M., Rohde, S.L., Wong, K.C. and Mitchell K.A.R., Growth and characterization of Cr2N/CrN multilayer coatings, Surface and Coatings Technology, 140, pp. 269-277, 2001. DOI: 10.1016/S0257-8972(01)01121-5 [ Links ]
[12] Warcholinski, B. and Gilewicz, A., Tribological properties of CrNx coatings, Journal of Achievements Materials Manufacturing Engineering, 37, pp. 498-504, 2009. [ Links ]
[13] Huang, Z.P., Sun Y. and Bell T., Friction behavior of TiN, CrN and (TiAl)N coatings, Wear, 173, pp. 13-20, 1994. DOI: 10.1016/0043-1648(94)90252-6. [ Links ]
[14] Chen, J-S and Duh, J-G, Indentation behavior and Young's modulus evaluation in electroless Ni modified CrN coating on mild steel, Surface and Coatings Technology, 139, pp. 6-13, 2001. DOI: 10.1016/S0257-8972(01)00987-2. [ Links ]
[15] Warcholinski, B., Gilewicz, A. and Ratajski, J., Cr2N/CrN multilayer coatings for wood machining tools, Tribology International, 44, pp. 1076-1082, 2011. DOI: 10.1016/j.triboint.2011.05.004. [ Links ]
[16] Ibrahim, M.A.M., Korablov, S.F. and Yoshima, M., Corrosion of stainless steel coated with TiN, (TiAl)N and CrN in aqueous environments, Corrosion Science, 44, pp. 815-828, 2002. DOI: 10.1016/S0010-938X(01)00102-0. [ Links ]
[17] Jehn, H.A., Improvement of the corrosion resistance of PVD hard coating-substrate systems Surface and Coatings Technology, 125, pp. 212-217, 2000. DOI: 10.1016/S0257-8972(99)00551-4. [ Links ]
[18] Conde, A., Navas, C., Cristóbal, A.B., Housden, J. and de Damborenea. J., Characterisation of corrosion and wear behaviour of nanoscaled e-beam PVD CrN coatings, Surface and Coatings Technology, 201, pp. 2690-2695, 2006. DOI: 10.1016/j.surfcoat.2006.05.013 [ Links ]
[19] Cunha, L. and Andritschky, M., Residual stress, surface defects and corrosion resistance of CrN hard coatings, Surface and Coatings Technology, 111, pp. 158-162, 1999. DOI: 10.1016/S0257-8972(98)00731-2 [ Links ]
[20] Deepthi, B., Barshilia, H.C., Rajama, K.S., Konchady, M.S., Pai, D.M. and Sankar, J., Structural, mechanical and tribological investigations of sputter deposited CrN-WS2 nanocomposite solid lubricant coatings, Tribology International, 44, pp. 1844-1851, 2011. DOI: 10.1016/j.triboint.2011.07.007 [ Links ]
[21] Nalbant, M. and Yildiz, Y., Effect of cryogenic cooling in milling process of AISI 304 stainless steel, Transaction of Nonferrous Metals Society of China, 21, pp. 72-79, 2011. DOI: 10.1016/S1003-6326(11)60680-8. [ Links ]
[22] Huyett G.L., Engineering Handbook, technical information, Industrial Press Inc. New York, 2000. [ Links ]
[23] Oliver, W.C., Pharr, G.M., An improved technique for determining hardness and elastic modulus using load and displacement sensing indentation experiments, Journal of Materials Research, 7, pp. 1564-1583, 1992. DOI: 10.1557/JMR.1992.1564. [ Links ]
[24] Peng, Z., Gong, J. and Miao, H., On the description of indentation size effect in hardness testing for ceramics: Analysis of the nanoindentation data, Journal of the European Ceramic Society, 24, pp. 2193-2201, 2004. DOI: 10.1016/S0955-2219(03)00641-1 [ Links ]
[25] Hones, P., Sanjines, R. and Lévy, F., Characterization of sputter-deposited chromium nitride thin films for hard coatings, Surface Coatings Technology, 94, pp. 398-402, 1997. DOI: 10.1016/S0257-8972(97)00443-X [ Links ]
[26] Barata, A., Cunha, L. and Moura, C., Characterisation of chromium nitride films produced by PVD techniques Thin Solid Films, 398, pp. 501-506, 2001. DOI: 10.1016/S0040-6090(01)01498-5 [ Links ]
[27] Han, Z., Tian, J., Lai, Q., Yu, X. and Li, G., Effect of N2 partial pressure on the microstructure and mechanical properties of magnetron sputtered CrNx films, Surface Coatings Technology, 162, pp. 189-193, 2003. DOI: 10.1016/S0257-8972(02)00667-9 [ Links ]
[28] Xu, J., Umehara, H. and Kojima, I., Effect of deposition parameters on composition, structures, density and topography of CrN films deposited by r.f. magnetron sputtering, Applied Surface Science, 201, pp. 208-218, 2002. DOI: 10.1016/S0040-6090(01)01498-5 [ Links ]
[29] Petrov, I., Barna P.B., Hultman, L. and Greene, J.E., Microstructural evolution during film growth, Journal of Vacuum Science and Technology A, 215, pp. S117-S128, 2003. DOI: 10.1116/1.1601610 [ Links ]
[30] Lou, J., Advanced structure materials - Mechanical Characterization of Thin Film Materials, Ed. Wole Soboyejo, pp. 35- 63, 2006. [ Links ]
[31] Park, H.-S., Kappl, H., Lee, K.H., Lee, J.-J., Jehn, H.A. and Fenker, M., Structure modification of magnetron-sputtered CrN coatings by intermediate plasma etching steps, Surface and Coatings Technology, 133-134, pp. 176-180, 2000. DOI: 10.1016/S0257-8972(00)00960-9 [ Links ]
[32] Mcguire, G.E. and Rossnagel, S.M., Vacuum Evaporation, Handbook of Thin Film Technology, Ed., McGraw-Hill, pp. 1-26. 1970. [ Links ]
[33] Zhaom, Y., Qian, Y., Yu, W. and Chen, Z., Surface roughness of alumina films deposited by reactive r.f. sputtering, Thin Solid Films, 286, pp. 45-48, 2006. DOI: 10.1016/S0040-6090(01)01498-5 [ Links ]
[34] Meza, J.M., Chávez, C. and Vélez, J.M., Indentation techniques: Mechanical properties measurement of ceramics, DYNA, 73 (149), pp. 81-93, 2006. [ Links ]
[35] Faghihi, D. and Voyiadjis, G.Z., Determination of nanoindentation size effects and variable material intrinsic length scale for body-centered cubic metals, Mechanics of Materials 44, pp. 89-211, 2012. DOI: 10.1016/j.mechmat.2011.07.002. [ Links ]
[36] Doerner, M.F. and Nix, W.D., A method for interpreting the data from depth sensing indentation instrument, Journal of Materials Research, 1 (4), pp. 601-609, 1986. DOI: 10.1557/JMR.1986.0601. [ Links ]
[37] Bolshakov, A. and Pharr, G.M., Influences of pile up on the measurement of mechanical properties by load and depth sensing indentation techniques, Journal of Materials Research, 13 (04), pp. 1049-1058, 1998. DOI: 10.1557/JMR.1998.0146. [ Links ]
[38] Korsunsky, A.M., Mcgurk, M.R., Bull, S.J. and Page, T., On the hardness of coated systems, Surface and Coatings Technology, 99 (1-2), pp. 171-183, 1998. DOI: 10.1016/S0257-8972(97)00522-7 [ Links ]
[39] Li, G., Chen, J. and Guan, D., Friction and wear behaviors of nanocrystalline surface layer of medium carbon steel, Tribology International, 43, pp. 2216-2221, 2010. DOI: 10.1016/j.triboint.2011.12.023. [ Links ]
[40] Harvey, E., Ladani, L. and Weaver, M., Complete mechanical characterization of nanocrystalline Al-Mg alloy using nanoindentation, Mechanics of Materials, 52, pp. 1-11, 2012. DOI: 10.1016/j.mechmat.2012.04.005. [ Links ]
[41] Ward, L.P. and Datta, P.K., Scratch test adhesion and hardness evaluation of sputtered Nb coatings as a function of the argon gas pressure, Thin Solid Films, 271, pp. 101-107, 1995. DOI: 10.1016/0040-6090(96)80086-1. [ Links ]
[42] Scheerer, H., Slomski, E.M., Trobmann, T. and Berger, C., Characterization of CrN coatings concerning the potential to cover surface imperfections, Surface and Coatings Technololy, 205, pp. S47-S50, 2010. DOI: 10.1016/j.surfcoat.2010.03.051 [ Links ]
[43] Thompson, C.V., Structure evolution during processing of polycrystalline films, Annual Review of Materials Science, 30, pp. 159-190, 2000. DOI: 10.1146/annurev.matsci.30.1.159. [ Links ]
[44] Bressan, J.D., Daros, D.P., Sokolowski, A., Mesquita, R.A. and Barbosa, C.A., Influence of hardness on the wear resistance of 17-4 PH stainless steel evaluated by the pin-on-disc testing, Journal of materials Processing and Technology, 205, pp. 353-359, 2008. DOI: 10.1016/j.jmatprotec.2007.11.251. [ Links ]
[45] Singh, K., Krishnamurthy, N. and Suri, A.K., Adhesion and wear studies of magnetron sputtered NbN films, Tribology International, 50, pp. 16-25, 2012. DOI: 10.1016/j.triboint.2011.12.023 [ Links ]
[46] Cai, F., Huang, X., Yang, Q., Wei, R. and Nagy, D., Microstructure and tribological properties of CrN and CrSiCN coatings, Surface and Coatings Technology, 205, pp. 182-188, 2010. DOI: 10.1016/j.surfcoat.2010.03.051 [ Links ]
[47] Holberg, K. and Matthews, A., Coatings Tribology: A concept, critical aspects and future directions, Thin Solid Films, 253, pp. 173-178, 1994. DOI: 10.1016/0040-6090(94)90315-8. [ Links ]
[48] Good, R.J., Theory of cohesive vs adhesive separation in an adhering system, Journal of Adhesion, 4 (2), pp. 133-154, 1972. DOI: 10.1080/00218467208072218. [ Links ]
[49] Lau, K.H. and Li, K.Y., Correlation between adhesion and wear behavior of commercial carbon based coating, Tribology International, 39 (2), pp. 115-123. 2006. DOI: 10.1016/j.triboint.2005.04.008 [ Links ]
[50] Wei, R., Langa, E., Rincon, C, and Arps, J.H., Deposition of thick nitrides and carbonitrides for sand erosion protection, Surface and Coatings Technology, 201 (7), pp. 4453-4459, 2006. DOI: 10.1016/j.surfcoat.2006.08.091 [ Links ]
A. Rúden-Muñoz, received the BSc. Eng in Physical Engineering in 2005, the MSc. degree in Physics in 2007, both from the Universidad Nacional de Colombia, and the PhD degree in Materials Engineering in 2009, in the Universidad del Valle, Colombia. His research interests include: production and characterization of materials by plasma assisted techniques for technological Apllications.
E. Restrepo-Parra, received the BSc. Eng in Electrical Engineering in 1990 from the Universidad Tecnológica de Pereira, Colombia, the MSc. degree in Physics in 2000, and the PhD degree in Engineering - automatic in 2009, the last two from the Universidad Nacional de Colombia. Manizales, Colombia. From 1991 to 1995, she worked in the Colombian electrical sector and since 1996 for the Universidad Nacional de Colombia. Currently, she is a senior professor in the Physics and Chemistry Department, Facultad de Ciencias Exactas y Naturales, Universidad Nacional de Colombia - Sede Manizales, Colombia. His research interests include: simulation and modeling of materials properties by several methods; materials processing by plasma assisted technique and materials characterization. She is currently director of the Laboratories Sede Manizales, Universidad Nacional de Colombia.
F. Sequeda, received the BSc. in Physics in 1970 in la Universidad Industrial de Santander, Colombia, the MSc. degree in Metalluergy Engineering in 1972 in University of Missouri, and the PhD in Materials Science in University of Illinois, USA. Currently, he is a full Professor in the Physics Department, Facultad de Ciencias, Universidad del Valle, Cali, Colombia. His research interests include: materials processing by plasma assisted technique and materials characterization.


