SciELO - Scientific Electronic Library Online

 
vol.38 issue2Effects of employees' physical and psychological characteristics over manufacturing systems' performanceFast Determination of Earthquake Depth Using Seismic Records of a Single Station, Implementing Machine Learning Techniques author indexsubject indexarticles search
Home Pagealphabetic serial listing  

Services on Demand

Journal

Article

Indicators

Related links

  • On index processCited by Google
  • Have no similar articlesSimilars in SciELO
  • On index processSimilars in Google

Share


Ingeniería e Investigación

Print version ISSN 0120-5609

Ing. Investig. vol.38 no.2 Bogotá May/Aug. 2018

https://doi.org/10.15446/ing.investig.v38n2.67711 

Original articles

An experimental study of surface roughness in electrical discharge machining of AISI 304 stainless steel

Estudio experimental de la rugosidad superficial del acero inoxidable AISI 304 maquinado por descarga eléctrica

Ignacio Hernández-Castillo1 

Orquídea Sánchez-López2 

Guillermo Arturo Lancho-Romero3 

Cuauhtémoc Héctor Castañeda-Roldán4 

1 Industrial Engineer, Technological Institute of Celaya, Mexico. Master of Science in Industrial Engineering, Technological Institute of Celaya, Mexico. Ph.D. Mathematical Modeling, Technological University of the Mixteca, Mexico. Affi liation: Research Professor, Technological University of the Mixteca, Mexico. E-mail: castillo@mixteco.utm.mx.

2 Chemical Engineer, Technological Institute of Celaya, Mexico. Master of Science in Industrial Engineering, Technological Institute of Celaya, Mexico. Ph.D. Mathematical Modeling, Technological University of the Mixteca, Mexico. Affiliation: Research Professor, Technological University of the Mixteca, Mexico. E-mail: orquidea@mixteco.utm.mx.

3 Bachelor degree in Mathematics, Benemérita Universidad Autónoma de Puebla, México. Master of Science in Mathematics, Benemérita Universidad Autónoma de Puebla, Mexico. Ph.D. Mathematical Sciences, Benemérita Universidad Autónoma de Puebla, Mexico. Affiliation: Research Professor, Technological University of the Mixteca, Mexico. E-mail: lanchoga@mixteco.utm.mx.

4 Bachelor degree in Mathematics, Benemérita Universidad Autónoma de Puebla, México. Master of Science in Mathematics, Benemérita Universidad Autónoma de Puebla, Mexico. Ph.D. Mathematical Sciences, Benemérita Universidad Autónoma de Puebla, Mexico. Affiliation: Research Professor, Technological University of the Mixteca, Mexico. E-mail: ccroldan@mixteco.utm.mx.


ABSTRACT

The effect of the pulse current, pulse on time and pulse off time on the surface roughness of AISI 304 stainless steel workpieces produced by electric discharge machining (EDM) using grade GSP-70 graphite electrodes was studied. A factorial design was performed, considering two levels for each of the three established parameters. From the statistical analysis, it was obtained that the pulse current and pulse on time are the most significant machining parameters on the obtained surface roughness values of the stainless steel AISI 304 workpieces machined by EDM. On the other hand, the regression analysis of a second order model was done to estimate the average roughness (Ra) in terms of the pulse current, pulse on time and pulse off time. Finally, the mean absolute percentage error (MAPE) of the roughness values estimated by the second order regression model and the roughness obtained experimentally is also presented.

Keywords: AISI 304 stainless steel; electric discharge machining; factorial design; average roughness

RESUMEN

En este artículo se presenta el estudio del efecto de la intensidad de la corriente eléctrica, tiempo de pulso y tiempo inactivo en la rugosidad superficial del acero inoxidable AISI 304 generada mediante el maquinado por descarga eléctrica (MDE), empleando electrodos de grafito grado GSP-70. Se realizó un diseño factorial, considerando dos niveles para cada uno de los tres factores establecidos. Del análisis estadístico se obtuvo que la intensidad de la corriente eléctrica y el tiempo de pulso son los parámetros de maquinado más significativos en la rugosidad superficial del acero inoxidable AISI 304 obtenida por MDE. Por otra parte, se hizo el análisis de regresión de un modelo de segundo orden para estimar la rugosidad media (Ra) en términos de la intensidad de la corriente eléctrica, tiempo de pulso y tiempo inactivo. Por último, se presenta el error porcentual absoluto medio (EPAM) de la rugosidad estimada mediante el modelo de regresión de segundo orden y la rugosidad obtenida experimentalmente.

Palabras clave: Acero inoxidable AISI 304; maquinado por descarga eléctrica; diseño factorial; rugosidad media

Introduction

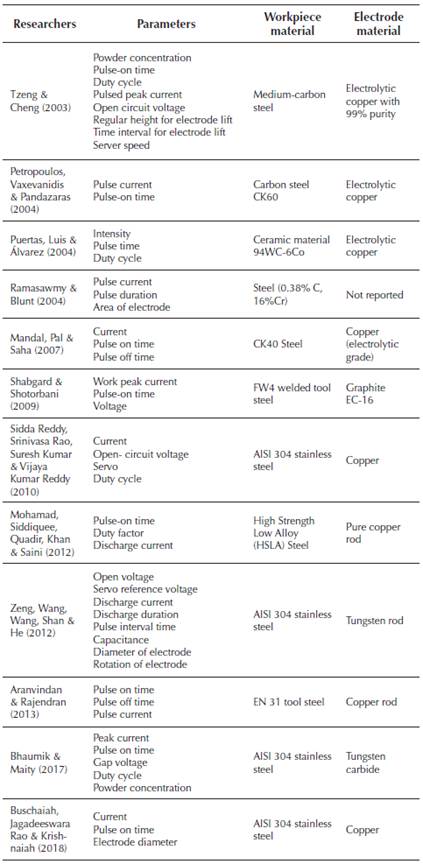
The term nontraditional machining refers to the group of processes that uses other mechanisms to remove materialfrom the workpiece by various techniques involving mechanical, thermal, electrical, chemical energy or combinations of these energies. Electric discharge machining (EDM) is one of the most widely used nontraditional processes. The shape of the finished work surface is produced by a formed electrode tool (Groover, 2013), connected to a DC power supply and placed in a dielectric fluid, a transient spark discharges through the fluid, removing a very small amount of metal from the workpiece surface (Kalpakjian & Schmid, 2014). The relation between EDM machining parameters and surface finish has been investigated. Some EDM machining parameters were studied, which are shown in Table 1, as well as the materials of the workpiece and electrode.

Table 1 Investigations on EDM process 

Source: Authors

This study used the factorial design 23 in order to analyze the influence of the selected input parameters including, the pulse current, the pulse on time and the pulse off time on the surface finish of stainless steel AISI 304 specimens by using the EDM processes. The relation between the machining parameters and average roughness (Ra) by means of a second order regression model was estimated, which was validated by using the analysis of variance (ANOVA) and calculating the mean absolute percent error (MAPE) technique. Likewise, the level for each input parameter which produces the lowest surface roughness was determined.

Experimentation is a key element in understanding the behavior of physical phenomena, and consists of deliberately changing system variables in order to observe and identify variations. Experimentation is used in two industries: design and improvement of process and products (Montgomery, 2004; Tanco, Viles, Ilzarbe & Álvarez, 2007). The techniques of Design of Experiments (DOE) analyze the individual effects and interactions of various parameters of any given process that is studied. DOE requires relatively few resources and provides information that can be used to model the process behavior and determine the combination of parameters levels that improves the performances (Montgomery, Peck & Vining, 2006; Gutiérrez & de la Vara, 2008).

Surface roughness

The surface roughness is a parameter used to evaluate the quality of the mechanical parts which predominantly affects its functionality and production costs (Mata-Cabrera, Hanafi, Khamlichi, Jabbouri & Bezzazi, 2013; Schultheiss, Hãgglund, Bushlya, Zhou & Stâhl, 2014). The average roughness (Ra) is the arithmetical mean of the examined roughness value in the machined zone. This is the most used parameter of roughness value due to its practicality, and it can be calculated by using the Equation (1):

where Ln is the evaluation length and Z is the distance between two points of the profile (ASME, 1995).

Method and material

Equipment and material used in the experiments

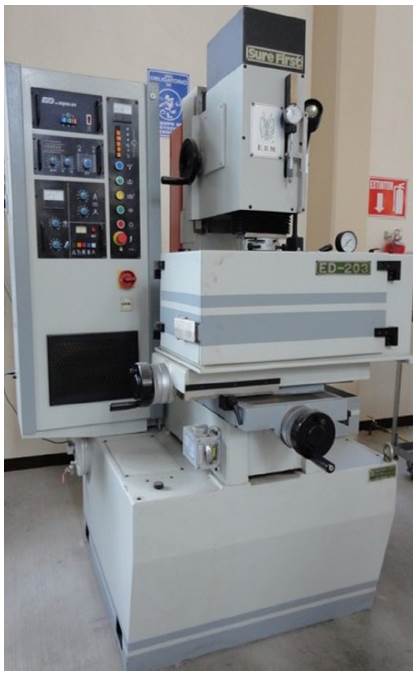
The die-sinking EDM machine of type Surefirst ED-203 was used in to machining of stainless steel workpieces as shows in Figure 1.

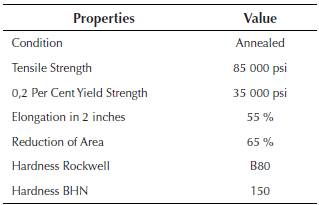
In the study, AISI 304 stainless steel was selected as the workpiece material, the specimens were made with dimensions of 100 mm x 25 mm x 6,35 mm. This steel is frequently used for chemical and food processing equipment; brewing equipment; cryogenic vessels; gutters; downspouts; flashings (Oberg, Jones, Horton & Ryffel, 2008). Its main properties are displayed in Table 2.

Table 2 Properties of the workpiece material 

Source: Oberg et al., 2008

Source: Authors

Figure 1 The used EDM machine. 

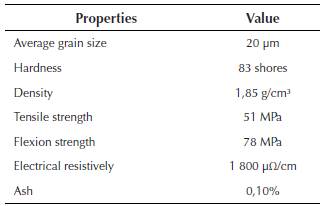
Graphite is one of the most used electrode material for EDM applications, because of its good thermal and electric properties (Klocke, Schwade, Klink & Veselovac, 2013). The experiments in this study were conducted using grade GSP-70 graphite electrodes, they were made with dimensions of 30 mm x 10 mm x 13 mm, and a new electrode was used in each replica of the experimental design. The grade GSP-70 graphite is an isotropic fine grain material with high purity and density levels, and as such is an ideal element to use with tasks involving EDM. Table 3 displays the most significant properties of the used electrodes material.

Table 3 Properties of the electrodes material 

Source: Grupo Rooe, 2018

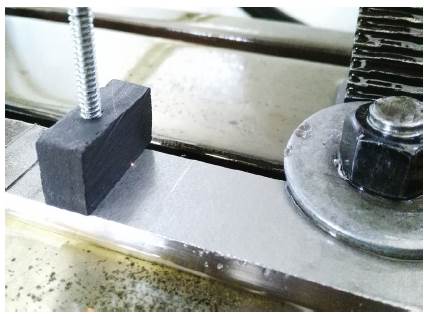
Figure 2 shows the workpiece and electrode materials used in this investigation.

Source: Authors

Figure 2 Workpiece and electrode materials. 

Design of experiments

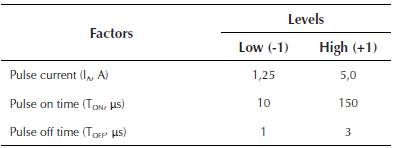
The two-level factorial design was used in this study with the three parameters concerned: the pulse current (IA, A), the pulse on time (TON, |js) and the pulse off time (TOFF, μs). Therefore, a two-level factorial design with three factors (23) was selected consistent with eight combinations for the factor levels, producing two replicas for each combination. The low and high levels for each factor were codified as -1 and +1, respectively.

Table 4 displays the used factors of this work with their levels, which are established on the used electric-discharge machine.

Table 4 Factors and levels selected for the experiments 

Source: Authors

Analysis of surface roughness

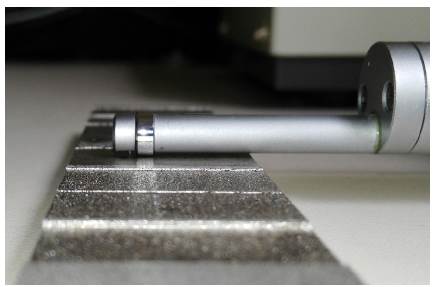
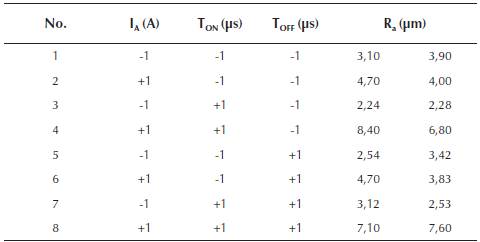
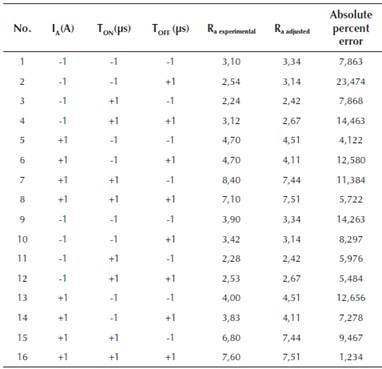
The machined surfaces were produced for each combination of levels of IA, TON and TOFF, and then based on the factors values established in the factorial design. The average roughness (Ra, pm) of the machined surfaces was measured by using the Mitutoyo SJ-402 series 178 profilometer, as shown in Figure 3. The results of the experiment of design 23 technique mentioned in this study are displayed in Table 5.

Source: Authors

Figure 3 Machined surfaces and profilometer. 

Table 5 Design of experiments matrix for the second-order model 

Source: Authors

Results and discussion

Regression model

The second order model related to the average roughness (Ra) and machining parameters (IA, TON and TOFF) generated in terms of the levels codified of the aforementioned parameters is displayed in Equation (2).

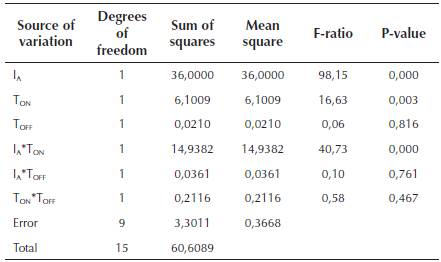
Table 6 shows the ANOVA results produced to check the adequacy of the second order. It can be noted that the P-value is less than α = 0,05, which means that the model possesses a confidence level of 95%, that represents the relationship between average roughness (Ra) and machining parameters (IA, TON and TOFF).

Table 6 Analysis of Variance for the regression model 

Source: Authors

In Table 7, the ANOVA analysis for the individual model coefficients is displayed. It can be noted that there are three parameters with P-value inferior to α = 0,05, meaning that these are indications of a confidence level of 95%. These significant parameters are: the pulse current (IA), the pulse on time (TON) and the interaction between them.

Table 7 Analysis of variance of Ra (μη־ι) 

Source: Authors

In addition to this, the coefficient of determination R2 = 94,55% obtained through the ANOVA technique explains the amount of reduction in the Ra variability obtained by using the machining parameters (IA, TON and TOFF) in the model.

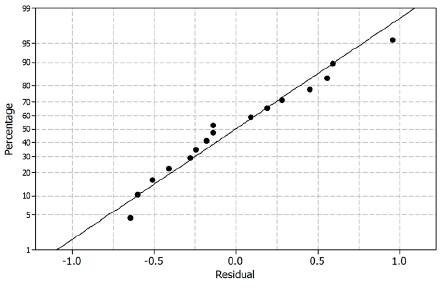
On the other hand, it can be observed in Figure 4 that the residues from average roughness are in line with normal distribution and the second order regression model has extracted all the information available from the experiment data.

Source: Authors

Figure 4 Normal probability plot of the residuals. 

Main effects

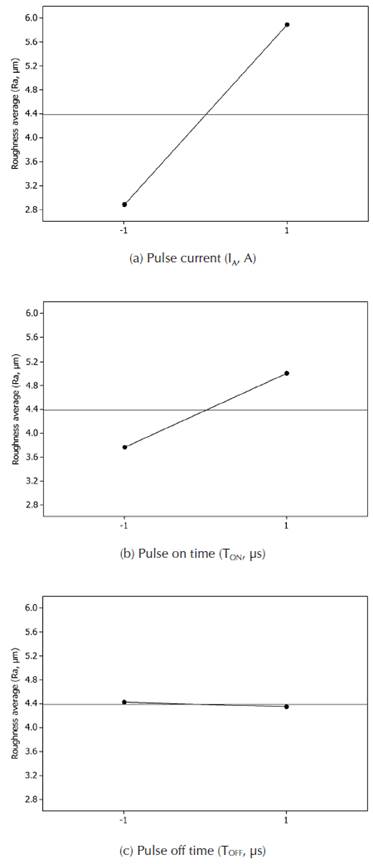
Figure 5 displays the graphical representations of the main effects of the resulting average roughness (Ra) and the parameters of the experimental design (IA, TON and TOFF). Figure 5a shows that the levels of pulse current (IA) significantly influence the obtained average roughness (Ra) values, and as increased the pulse current, the average roughness increased. In Figure 5b, it can be observed that the average roughness increases as the pulse on time (TON) increases, meaning that the pulse current can significantly affect average roughness values. Figure 5c shows that the pulse off time does not affect the average roughness (Ra), as there is no significant variation between the mean data for each parameter level.

Source: Authors

Figure 5 Main effects for the Ra (pm) and the experimental parameters of the design (a) IA, (b) TON and (c) TOFF.  

Cube plot

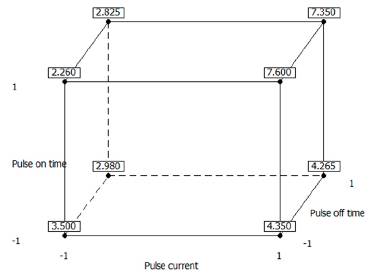
The cube plot in Figure 6 shows that the lowest average figure for average roughness is 2,260 pm between the eight combinations of levels for the experiment parameters, obtained with levels -1(1,25 A), +1 (10 ps) and -1 (1 ps) for IA, TON and TOFF, respectively. The highest Ra value is 7,600 pm, obtained through a combination of 1, 1 and -1, which corresponds to IA of 5,0 A, TON of 150 ps and TOFF of 1 ps.

Source: Authors

Figure 6 Cube plot (data means) for Ra. 

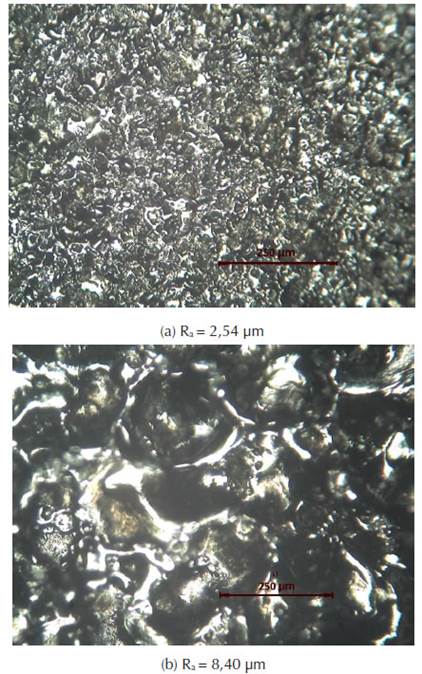
Figure 7 displays the differences between the surface finishes values obtained under different machining conditions. Figure 7a shows a surface roughness micrograph of 2,54 pm value machined using a pulse current (IA) of 1,25 A, a pulse on time (TON) of 10 ps and a pulse off time (TOFF) of 3 ps. Likewise, Figure 7b displays a surface finish micrograph with a value of 8,40 pm obtained using a pulse current (IA) of 5,00 ps, a pulse on time (TON) of 150 ps and a pulse off time (TOFF) of 1 ps.

Source: Authors

Figure 7 Surfaces roughness micrograph (a) Ra = 2,54 pm and (b) Ra = 8,40 pm. 

Mean absolute percent error

The mean absolute percent error (MAPE) is the average of the absolute differences between the adjusted and experimental R values, expressed as a percent of experimental values (Heizer & Render, 2011) and is computed with using the Equation (3):

Table 8 shows the absolute percent errors computed. The sum of percent errors is 152,131%, therefore, the value of MAPE is 9,508%. MAPE expresses the error as a percent of the experimental values, undistorted by a single large value.

Table 8 Absolute percent errors 

Source: Authors

Conclusions

The following conclusions are obtained based on the experiment results, the ANOVA technique, the second order regression model and the tests conducted for the present work:

  • - The factorial design 23 used in this study is an effective tool to study the influence of machining parameters on the surface roughness of AISI 304 stainless steel, produced by using of electrical discharge machining.

  • - The pulse current (IA) and pulse on time (TON) are the most significant parameters, obtained with a confidence level of 95% on EDM machining of AISI 304 stainless steel.

  • - The surface roughness of the AISI 304 stainless steel wor-kpieces decreased with a using of low pulse current (IA) and a low pulse on time (TON). It is recommended that the electrical discharge machining of AISI 304 stainless steel be performed with a pulse current (IA) of 1,25 A, a pulse on time (TON) of 10 ps and a pulse off time (TOFF) of 3 ps, in order to obtain lower levels of surface roughness values.

  • - The normal probability plot shows that the residuals follow a straight line, which implies that the residuals are distributed normally, therefore the adequacy of the regression model is validated.

  • - The value of MAPE obtained is 9,508%, which is perhaps the easiest measure to interpret, because expresses a percent of experimental values.

References

ASME B46.1 (1995). Surface texture (surface roughness, waviness and lay). The American Society of Mechanical Engineers. USA. [ Links ]

Aravindan, A. & Rajendran, S. (2013). Optimization of Machining Parameters in EDM process by using Robust Design. International Journal of Advanced Scientific and Technical Research, 3, (2), 383-388. [ Links ]

Bhaumik, M. & Maity, K. (2017). Effect of machining parameter on the surface roughness of AISI 304 in silicon carbide powder mixed EDM. Decision Science Letters, 6, 261-268. DOI: 10.5267/j.dsl.2016.12.004 [ Links ]

Buschaiah, K., Jagadeeswara Rao, M. & Krishnaiah, A. (2018). Investigation On The Influence Of Edm Parameters On Machining Characteristics For Aisi 304. Materials Today: Proceedings, 5, 3648-3656. [ Links ]

Groover, M. P. (2013). Fundamentals of modern manufacturing: materials, processes and systems. John Wiley & Sons, United States of America. [ Links ]

Grupo Rooe. (2018). Especificaciones técnicas: Grado GSP-70. México. [ Links ]

Gutiérrez, H. & de la Vara, R. (2008). Análisis y diseño de experimentos. McGraw-Hill S. A. de C. V. México. [ Links ]

Heizer, J. & Render, B. (2011). Operations management. Pearson Education, United States of America. [ Links ]

Kalpakjian, S. & Schmid, S. R. (2014). Manufacturing engineering and technology. Pearson Education, Singapore. [ Links ]

Klocke, F., Schwade, M., Klink, A. & Veselovac, D. (2013). Analysis of material removal rate and electrode wear in sinking EDM roughing strategies using different grafite grades, Procedia CIRP, 6, 163-167. [ Links ]

Mandal, D., Pal, S. K. & Saha, P. (2007). Modeling of electrical discharge machining process using back propagation neural network and multi-objective optimization using non-dominating sorting genetic algorithm-II. Journal of Materials Processing Technology, 186, 154-162. DOI: 10.1016/j.jmatprotec.2006.12.030 [ Links ]

Mata-Cabrera, F., Hanafi, I., Khamlichi, A., Jabbouri, A. & Bezzazi, M. (2013). Predictive Models for Different Roughness Parameters During Machining Process of Peek Composites Using Response Surface Methodology. Ingeniería, Investigación y Tecnología, 14, (4), 463-474. [ Links ]

Montgomery, D. C. (2004). Diseño y Análisis de Experimentos. Editorial Limusa S. A. de C. V., México. [ Links ]

Montgomery, D. C., Peck, E. A. & Vining, G. G. (2006). Introducción al análisis de regresión lineal. Compañía Editorial Continental, México. [ Links ]

Mohamad, A. B., Siddiquee, A. N., Quadir, G. A., Khan, Z. A. & Saini, V. K. (2012, February). Optimization of EDM process parameters using Taguchi method. International Conference on Applications and Design in Mechanical Engineering, Penang, Malaysia. [ Links ]

Oberg, E., Jones, F. D., Horton, H. L. & Ryffel, H. H. (2008). Machinery's Handbook. Industrial Press, New York. [ Links ]

Petropoulos, G., Vaxevanidis, N. M. & Pandazaras, C. (2004). Modeling of surface finish in electro-discharge machining based upon statistical multi-parameter analysis. Journal of Materials Processing Technology, 155-156, 1247-1251. DOI: 10.1016/j.jmatprotec.2004.04.189 [ Links ]

Puertas, I., Luis, C. J. & Álvarez, L. (2004). Analysis of the influence of EDM parameters on surface quality, MRR and EW of WC-Co. Journal of Materials Processing Technology, 153-154, 1026-1032. DOI: 10.1016/j.jmatprotec.2004.04.346 [ Links ]

Ramasawmy, H. & Blunt, L. (2004). Effect of EDM process parameters on 3D surface topography. Journal of Materials Processing Technology, 148, 155-164. DOI: 10.1016/S0924-0136(03)00652-6 [ Links ]

Schultheiss, F., Hãgglund, S., Bushlya, V., Zhou, J. & Stâhl, J-E. (2014). Influence of the minimum chip thickness on the obtained surface roughness during turning operations. Procedia CIRP, 13, 67-71. [ Links ]

Shabgard, M. R. & Shotorbani, R. M. (2009). Mathematical Modeling of Machining Parameters in Electrical Discharge Machining of FW4 Welded Steel. World Academy of Science, Engineering and Technology, 52, 403-409. [ Links ]

Sidda Reddy, B., Srinivasa Rao, P., Suresh Kumar, J., & Vijaya Kumar Reddy, K. (2010). Parametric study of electrical discharge machining of AISI 304 stainless steel. International Journal of Engineering Science and Technology, 2, (8), 3535-3550. [ Links ]

Tanco, P., Viles, E., Ilzarbe, L. & Álvarez, M. J. (2007). Manufacturing industries need Design of Experiments (DoE). Lectures notes in Engineering and Computer Science, 2, 1108-1113. [ Links ]

Tzeng, Y. F. & Chen, F. C. (2003). A simple approach for robust design of high-speed electrical discharge machining technology. International Journal of Machine Tools & Manufacture, 43, 217-227. DOI: 10.1016/S0890-6955(02)00261-4 [ Links ]

Zeng, Z., Wang, Y., Wang, Z., Shan, D. & He, X. (2012). A study of micro-EDM and micro-ECM combined milling for 3D metallic micro-structures. Precision Engineering, 36, 500-509. DOI: 10.1016/j.precisioneng.2012.01.005 [ Links ]

How to cite: Hernández-Castillo, I., Sánchez-López, O., Lancho-Romero, G. A., Castañeda-Roldán, C. H. (2018). An experimental study of surface roughness in electrical discharge machining of AISI 304 stainless steel. Ingeniería e Investigación, 38(2), 90-96. DOI: 10.15446/ing.investig.v38n2.67711

Received: September 12, 2017; Accepted: May 04, 2018

Creative Commons License This is an open-access article distributed under the terms of the Creative Commons Attribution License