Services on Demand
Journal
Article
Indicators
-
 Cited by SciELO
 -
 Access statistics
Related links
-
 Cited by Google
 -
 Similars in
SciELO
 -
 Similars in Google
Share
Revista Facultad de Ingeniería Universidad de Antioquia
Print version ISSN 0120-6230On-line version ISSN 2422-2844
Rev.fac.ing.univ. Antioquia vol.38 no.1 Medellín Jan./Jun. 2006
Experimental studies to assess stainless steel high temperature hardness
Amalia Ana Dascal*
University POLITEHNICA Timisoara, Faculty of Engineering Hunedoara, Rumania
(Recibido el 02 de marzo de 2005. Aceptado el 15 de mayo de 2006)
Abstract
This paper presents experimental studies conducted to assess the mechanical viability of hardness at high temperature. The studies were carried out on a Brinell hardmeter using original heating precincts of the test-bars. Thermal-resistant steel types, which are commonly subjected at high operational temperatures, were used for the experiments. The precincts and the annex elements, as well as the results are shown. Results can be used to determine the actual life time of component parts made out of this steel.
Key words: Brinell hardness, high temperature, thermal-resistent steel grade.
Estudios experimentales para evaluar el endurecimiento de aceros a alta temperatura
Resumen
Este artículo presenta los resultados de estudios experimentales llevados a cabo para evaluar la viabilidad del endurecimiento de aceros usando alta temperatura. Los experimentos se realizaron con un medidor de dureza Brinell, empleando los componentes originales. Aceros resistentes a alta temperatura, del tipo comúnmente empleado en aplicaciones a alta temperaturas, fueron utilizados en esta investigación. Los resultados de esta investigación pueden ser usados para determinar la vida útil de piezas hechas con este tipo de aceros.
Palabras clave: dureza Brinell, alta temperatura, resistencia térmica, grado acero.
Introductory concepts
Testing of hardness at high temperatures has gained more importance since structural components of boilers, gas and steam turbines, reactors, etc., are subjected to high temperatures during long periods of time, and therefore experience considerable mechanical charges. Hardness testing at high temperature displays some advantages over traction testing, since it is a quicker method and it can be conducted with a much simpler apparatus.
Hardness is a conventional, although complex, magnitude that is related to the deformability of the superficial layers of a material under well-determined work conditions. It is worth mentioning that, until now, high-temperature hardness tests have not been standardized at national or European level. The few references available in literature [1] aim at establishing correlations between the hardness and other mechanical properties obtained at high temperatures (for instance, the correlation between hardness and the traction resistance or the resilience at high temperature). In choosing the testing method to be used at high temperature it is important to consider factors such as: if the surface of the resistance element can be explored for hardness traces; the nature of the material under tests; the domain of probable hardness; the precision of the hardness tests; the heating means (oven, and temperature control system).
Precints has to meet the following requirements: temperature should attain the target value, and the temperature in the entire test rod should be the same and remain constant throughout the test. Among the static methods used to determine hardness at high temperature, the Brinell method has the advantage that harness meters allow the selection of certain pressing charges (1,839 kN; 2,452 kN; 4,903 kN; 9,807 kN; 14,71 kN si 29,42 kN)), thus achieving various values for the strain amount k = 0,102 F/D2; (2,5; 5; 10; 15 or 30). Other methods, such as Rockwell or Vickers, could also be used to perform high temperature testing under certain conditions, namely when the endowment of the laboratory allows it.
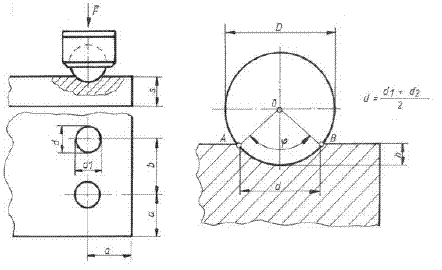
Hardness testing according to Brinell method, [2, 3], consists in pressing a penetrating element (tempered steel ball or ball made of metallic carbide) having the diameter D, with a static force F, perpendicularly to the flat, polished surface of the test rod to be examined and then maintaining it for a given period of time (10-15 s). After release of the test force a print can be seen on the surface of the test rod, with the shape of a spherical calotte (the diameter being equal to that of the ball). The print has a diameter d (also considered as a mean value between two diameters of the print, measured by perpendicular directions) on the surface of the test rod t. The basic diagram of the hardness trial by Brinell method is shown in figure 1.
Figure 1 The principle diagram of the Brinell hardness trial
On selecting the parameters of the trial and the test rod dimensions we had in view the regulations given in SR EN 10003-1:1997 Brinell harness trial Part 1: Method of trial.The Brinell hardness is abbreviated either as HBS (when a steeled ball is being used) or HBW (when a wolfram carburized ball is being used) and the following equation is given:
in which: F force [N], the ball diameter D and the medium stamp diameter d [mm];The symbol HBS and HBW is preceded by the hardness value and followed by an index that represents the ball diameter [mm], the weight charge [kgf] and the time the charge was applied [s]. The simplified notation HBS (or HB) or HBW is reserved for the trial where D = 10 mm, F = 3.000 kgf (29,42 kN) and the time the charge was applied = 10…15s.
The size of the weight charge and the ball diameter must be chosen as to comply with the following criteria:
• The mean diameter, d, of the stamp must be between the values 0,24 D and 0,6 D;
• The stamp intensity, h [mm], given by the relation  must be at least 1/8 of the test-bar’s thickness.
• The distance between the center of a stamp and the edge of the test-bar must be a ≥ 2,5d (for hardness ≥ 150 HB) and a ≥ 3d (for materials with hardness < 150 HB).
• The distance between the centers of two adjoining stamps must be b 4d (for hardness 150 HB) and b 6d (for materials with hardness < 150 HB).The geometrical similitude provided by the Φ angle, which is the same for all stamps, is used in order to compare the values of Brinell hardness for the same material, evaluated at different balls and weight charges. Therefore, the concept of degree of requirement k = 0,102 F/D²; has been introduced, and provides the equality of reports
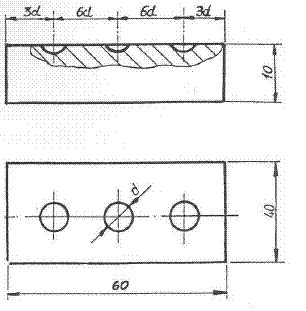
Considering the recommendations just given and admitting that the hardness of the studied steel at high temperature can be either lower than or higher than 150 HB, the following conditions were selected: mean diameter of the stamp d ≤ 6 mm, and diameter of the steel ball D = 10 mm for which results: a ≥ 2,5•6 = 12 mm, b ≥ 4•6 = 24 mm, and the minimum thickness of the test-bar smin = 8 mm (Chart A.1 from SR EN 10003-1:1997). Using these geometrical elements and considering that three stamps are being made for each high temperature testing, the dimensions shown in figure 2 have been selected for the test-bars L x l x s = 60 x 40 x 10.
Figure 2 The shape and measures of the test-bar in the testing of hardness in accordance to Brinell method
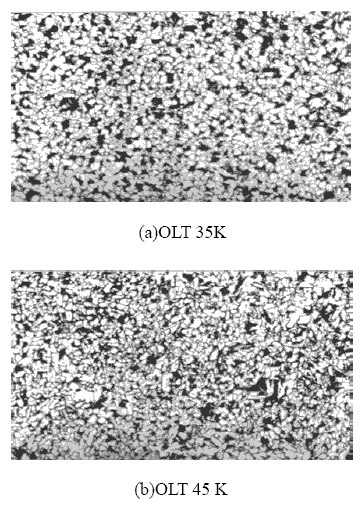
The metallography of the test rods was determined in the as-received samples and after testing; the initial structures are given in figure 3. The reactive used was nital 2% and the samples were studied with 100X magnification. The metallographic study showed that OLT 35K steel (figure 3a) has a ferrito-pearlitic structure with a real grain ranked 7-6 according to SR ISO 643-93 and the specimen taken from OLT 45K (figure 3b) has a feritte-perlite structure, slightly inhomogeneous (it contains sides with grains). The structures agree with the specification of the provider.
Figure 3 The structure of OLT 35K and OLT 45K as-received steel samples
The precincts of heating at hardness testing
According to the specialized literature [4], the primary requirement for a meaningful high-temperature hardness testing is that the temperature of the tested specimen and the temperature of the penetrator be the same. The shape of the precincts, which should be adapted to the method used for hardness testing, must provide the heating to achieve the testing temperature in the test-bar and in the penetrator. Precincts should be isolated from the device table (it contains asbestos fittings) and/or any other fitting that acts as an isolator.
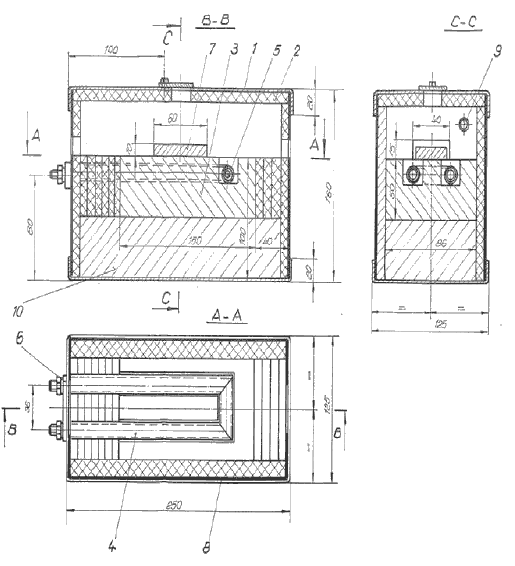
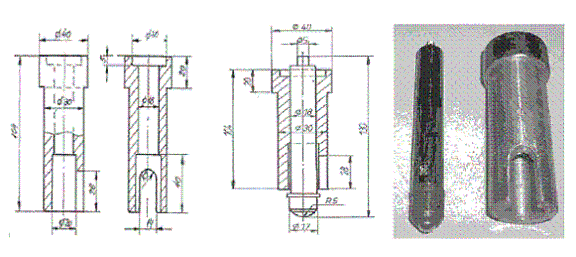
Heating precincts were designed, constructed and implemented before the hardness test (figure 4); these were adjusted to a PH – C – 02/02 hardmeter. The heating precinct is parallelepiped in shape and it is equipped with two lateral orifices (in the shape of a rectangle): one for introducing and the other for extracting the test bar. Precinct is made in such a way that it can be fixed to the work-table of the Brinell hardmeter and remain there during all experiments, i.e. only the relative position of the test-bar to the penetrator has to be changed so that three testing can be done on a single test-bar. The modification of the test bar’s position is done with the help of a rod, which ensures the advancement of the test-bar throughout two guides as well as its removal from the precinct.
To correctly carry out the hardness testing preliminary alternatives of heating the hardness plate have been evaluated (7), so that the precincts support does not take on part of the compression force. Therefore, a rectangular plate made of steel (3), with the thickness of 50 mm, was used as a support. A channel permits to include an electrical resistance heating medium (5). The resistance is isolated from the steel plate by a ceramic tube (4). Electric supply to the resistance was done through one of the sides of the precincts (6). At the same time, the resistance has been isolated from the exterior wall of the precinct, so as to reduce electrical hazards. In order to reduce the heat transmission in the elements of the Brinell apparatus, the resistance plate (3) has been set on another plate (10).
The heating precinct is equipped with orifices for the assembly of the instruments used for measuring temperature.
Figure 4 Precincts for hardness testing
The metallic exterior wall (8) of the precinct is made of boiler iron plate; the insulation has been made of different asbestos layers (2). The precincts are equipped with a lid, in which an escape was formed for allowing the penetration of the rod and its thermal-protective jack. The precinct temperature, and implicitly the test-bar temperature, is being adjusted by computer. To ensure the equality of the test-bar temperature and that of the penetrator (a steel ball in this case), it has been resorted to the alternative of the rod penetrator’s prolongation as well as to the achievement of a thermal protection of this rod, through a jack suitable for the top of the Brinell hardmeter. These alternatives are shown in figure 5. Asbestos rings, which provide thermal protection, have been introduced inside the thermal protective jack. The rings also provide air-tightness of the workroom area and the charging top of Brinell apparatus. The position of the charging ensemble can be vertically adjusted so that the bottom end of the jack is leveling the tangent at the penetrator.
Experimental testing description
The cross section of the test-bar used is rectangular in shape. It is sized in such a way so that three stamps can be made.
The stages that should be followed to conducting hardness testing at high temperature are as follows:
• The precinct of heating is set on the work-table of the Brinell hardmeter.
Figure 5 The alternatives of the rod penetrator’s prolongation and the thermal protection of the rod for plane surfaces
• The test-bar is introduced in the precinct and the lateral orifices are air-tightened.
• The penetrator of the apparatus, which is assembled at the end of the prolonging rod, is brought into contact with the surface of the test-bar.
• The lids of the precincts are placed around the jack, which provides thermal protection of the penetrator lengthener and the fixation of the test-bar for the testing.
• Set up of computerized control for the testing temperature.
• After reaching the target temperature in the test-bar, hardness testing is done; two other experimental points are obtained without being necessary to draw out of the test-bar from the precincts.
• The test-bar is drawn out of the precincts after the testing, and by means of a tooling microscope two perpendicular diameters of the same stamp are measured. This value allows calculation of the hardness of the test-bar material.
Some changes were introduced in the above-described system to make it possible using the Brinell PH – C – 02/02 hardness apparatus made by “Balanta” Sibiu: in the electrical scheme, the control of the folding system of the charging end has been cancelled so that the penetrator support stays vertically all the time. This allows achieving three readings on a single test-bar without having to lift the lid after each testing; however, reading of the stamp diameters on the optic system of the apparatus is no longer available.
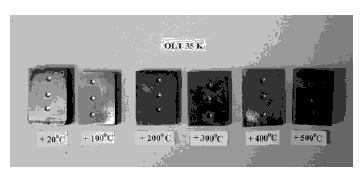
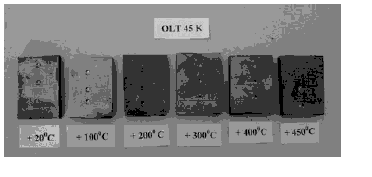
Two types of thermal resistant steel, selected from those used in the manufacture of steam tubes, that is: OLT 35K and OLT 45K, were used in this study. The normalized test-bars have been tested both at ambient temperature and at high temperature up to +500 ºC. Figure 6 shows OLT 35K test-bars and Figure 7 OLT 45K test-bars, after hardness testing at high temperature: +20 ºC; +100 ºC; +200 ºC; +300 ºC; +400 ºC; +500 ºC.
Results and discussion
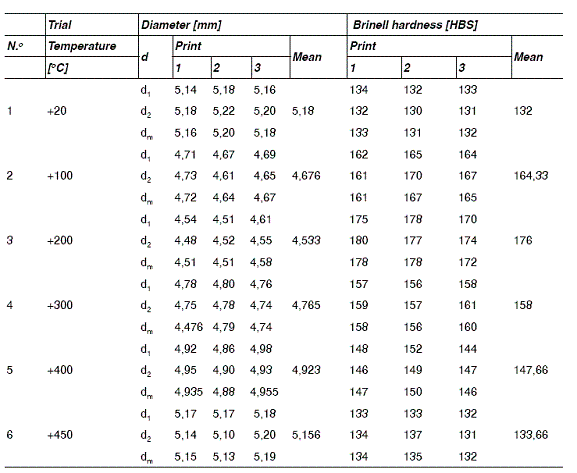
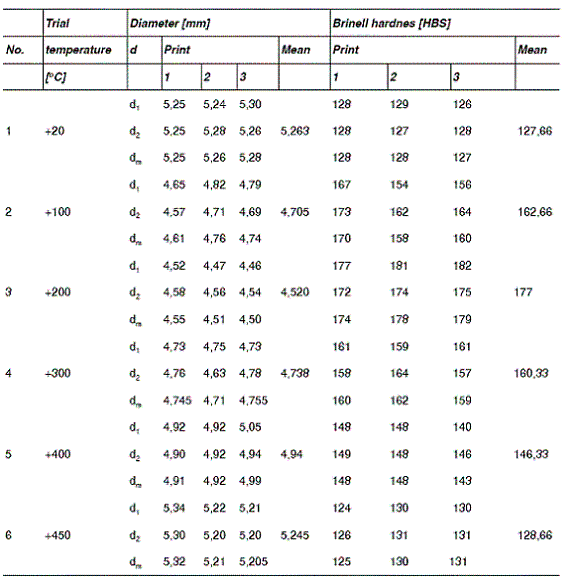
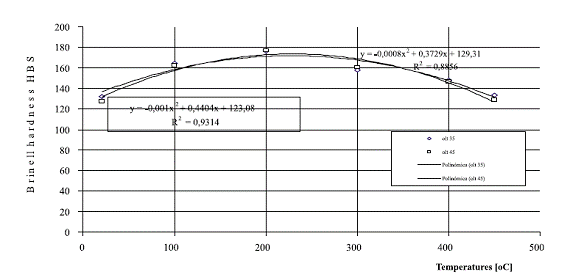
Tables 1 and 2 present the results of the print diameters, mean diameter and hardness for each type of steel as a function of temperature. The curves of hardness variation have been drawn with the values of hardness from the chart, depending on the testing temperature for each type of steel, shown in figure 4.
Figure 6 Set of test rods made of OLT 35K, unused material, tried at high temperatures
Figure 7 Set of test rods made of OLT 45K, unused material, tried at high temperatures
Table 1 Brinell hardness at high temperature of OLT 35K steel, after tempering
Figure 4 shows the effect of temperature on Brinell hardness. Hardness initially increases with temperature, with a maximum at temperatures between 200 and 250 ºC, after which it decreases. Data were correlated with a 2nd degree polynomial; correlation coefficient was R2 = 0.8856 for OLT 35K steel, and R2 = 0,9314 for OLT 45K steel. Therefore, it can be concluded that hardness follows a quadratic dependence on temperature.
Table 2 Brinell hardness at high temperature of OLT 45K steel, after tempering
It should also to be noticed that all the hardness values are higher than 132 HBS for steel OLT 35K and higher than 127 HBS for steel OLT 45K. These values are encouraging because these steels are used in the manufacturing of parts that work under high pressure and temperature.
From the data obtained from hardness testing, as well as from the analysis of figure 8, it can noticed that hardness shows a variation similar to the drive breaking resistance Rm for the studied steels, that is, Brinell hardness is directly proportional to temperature, up to 200 oC, and then starts to decrease. This lets us conclude that the drive breaking resistance of steel can be established by knowing its hardness and vice versa. The specialized literature also provides relations between the two characteristics.Figure 8 The curves of hardness variation with temperature, for the tested steel
References [ Links ]
2. F. Weber, “The Resistance of Materials Laboratory Guide-book”. The Mirton Publishing. Timisoara. 2000. pp. 33-38. [ Links ]
3. SR EN 10003-1:1997. Metallic materials. The Brinell hardness testing. Part 1. Testing method. [ Links ]
4. A. M. Borzdîk, “Metodî goriaceh mehaniceschih ispîtanii metallov”. Ed. Metalurghia. Moscova. 1962. pp. 425-445. [ Links ]
* Autor de correspondencia. Teléfono: +40254/207527, fax: +40254/207502, correo electrónico: amalia@fih.utt.ro.


