Services on Demand
Journal
Article
Indicators
-
 Cited by SciELO
 -
 Access statistics
Related links
-
 Cited by Google
 -
 Similars in
SciELO
 -
 Similars in Google
Share
Revista Facultad de Ingeniería Universidad de Antioquia
Print version ISSN 0120-6230
Rev.fac.ing.univ. Antioquia no.74 Medellín Jan./Mar. 2015
ARTÍCULO ORIGINAL
An empirical method for the estimation of yield strength on bonds and strands of expanded metal meshes
Un método empírico para la estimación del límite de fluencia en nodos y venas de mallas de metal expandido
Dimas José Smith-López1, Carlos Alberto Graciano-Gallego2*, Gennifer Nataly Aparicio-Carrillo3
1 Departamento de Mecánica y Tecnología de la Producción, Universidad Nacional Experimental Francisco de Miranda. Complejo Académico El Sabino, Prolongación Av. Táchira. C.P. 4102. Punto Fijo, Venezuela.
2 Facultad de Minas, Departamento de Ingeniería Civil, Universidad Nacional de Colombia (Sede Medellín). Calle 59A N.° 63-20. C.P. 050034. Medellín, Colombia.
3 Facultad de Ingeniería, Centro de Investigaciones en Mecánica (CIMEC), Universidad de Carabobo. Av. Universidad, Bárbula. 2005. Valencia, Venezuela.
* Corresponding author: Carlos Alberto Graciano Gallego, e-mail: cagracianog@unal.edu.co
(Received April 06, 2014 ; accepted October 27, 2014)
Abstract
The manufacturing process of expanded metal meshes is based upon an in-line expansion of partially slit metal sheets, creating a pattern formed by strands and bonds. After this process, the mechanical properties of the base material change, especially in the bonds. Due to the size of strands and bonds, it is difficult to quantify the amount of cold work that the base metal undergoes, hence the mechanical properties in the final meshes are difficult to predict. This paper presents an empirical method for the estimation of the yield strength on standard and flattened expanded metal, correlating Vickers microhardness with the yield strength using the Tabor's relationship. In addition, the effect of various heat treatments on the yield strength of expanded metal was investigated. Results show that the yield strengths estimated through the Tabor's equation are in good agreement with those obtained through standard mechanical testing, for various levels of cold work. In addition, it was found that the manufacturing process introduces some degree of heterogeneity and anisotropy in the material, and that long times of exposure to heat treatments are required to mitigate the effects of the cold work.
Keywords: Expanded metal, heat treatment, Vickers microhardness, yield strength
Resumen
El proceso de fabricación de mallas de metal expandido se basa en la expansión en línea de láminas de metal parcialmente cortadas, creando un patrón formado por venas y nodos. Después de este proceso las propiedades mecánicas del metal base cambian, especialmente en los nodos. Debido al tamaño de las venas y los nodos es difícil cuantificar la cantidad de trabajo en frío que estos experimentan, en consecuencia las propiedades mecánicas en las mallas finales son difíciles de predecir. Este trabajo presenta un método empírico para la estimación del esfuerzo de fluencia de mallas de metal expandido estándar y aplanado, correlacionando la microdureza Vickers con el esfuerzo de fluencia mediante la relación de Tabor. Adicionalmente, se evalúa el efecto de diferentes tratamientos térmicos sobre el esfuerzo de fluencia del metal expandido. Los resultados muestran que los esfuerzos de fluencia estimados a través de la ecuación de Tabor concuerdan con los obtenidos a través de ensayos mecánicos para diferentes niveles de trabajo en frío. Adicionalmente, se obtuvo que el proceso de manufactura introduce en el material cierto nivel de heterogeneidad y anisotropía, y que se requieren tratamientos térmicos con largos tiempos de exposición para reducir los efectos del trabajo en frío.
Palabras clave: Metal expandido, tratamientos térmicos, microdureza Vickers, esfuerzo de fluencia
Introduction
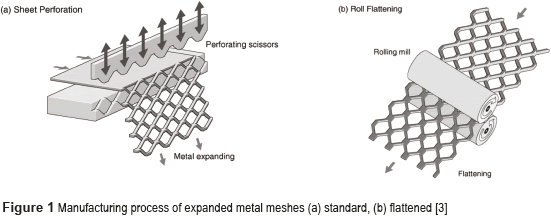
The manufacturing process of expanded metal, originally called slashed metallic screening, was first patented in 1884 [1]. In general, the manufacturing process of standard expanded metal (Figure 1a) is based upon the in-line expansion of partially slit metal sheets, producing diamond-like patterns.
Expanded metal sheets are regularly fabricated in two basic types: standard expanded metal (SEM) and flattened expanded metal (FEM) [2]. These two sheets are quite different in geometry and mechanical properties. The flattened type (Figure 1b) undergoes additional cold working, the standard sheet is passed through a cold-roll reducing mill providing a smoother flat surface. By flattening the mesh, the thickness of the material is reduced and the sheet is elongated about 5%, but the width of the sheet remains the same.
The mechanical properties of the base metal, in both SEM (slitting and stretching) and FEM (slitting, stretching and flattening) meshes, are changed during the manufacturing process. These changes are due to a severe plastic deformation owing to strain hardening that may result in higher hardness and yield strength. Expanded metal cells are characterized by two axes, a minor one (dv) in the slitting direction and a major one (dh), see figure 2.
Since hardness is a direct measure of the material strength, it can be related to its yield strength [4]. Microhardness measurements are an efficient way to characterize the mechanical behavior of a material [5]. Measuring Vickers microhardness (HV) has been the most popular approach used to establish a relationship between hardness and yield strength. It is mainly due to the following reasons: (1) its higher resolution for spherical indenters, and (2) its indenter is similar to the one used for Vickers hardness; therefore, the measured hardness is ideally independent of the indentation load and indentation depth [6].
In [4], a series of experimental studies were developed showing that the hardness can be related to representative yield strength of the material σy by using Eq. (1) based on the indentation theory of rigid-perfectly plastic solid. Accordingly, for non-strain hardening materials, Tabor's relationship can be expressed as:

where σy is the representative yield strength, HV is the Vickers hardness, and C is a constant between 2.9 and 3.0. Later, [7] suggested to use an expression similar to Eq. (1) for strain hardening materials, but evaluated at a representative plastic strain of 0.08.
Thereafter, several attempts have been made to estimate the 0.2% offset yield strength. Using Rockwell hardness data, [8] proposed a method for the estimation of the yield strength. Using Vickers and Meyer hardness, [9] also proposed an empirical expression that allows the calculation of yield strength without knowing its stress-strain curve; this expression is defined by Eq. (2):

where σy is the 0.2% offset yield strength, HV is the Vickers hardness and m=n+2 is the Meyer's hardness coefficient. For a given Meyer's coefficient m, Eq. (2) clearly shows proportionality between σy and HV. Thus, for fully strain-hardened metals, m is approximately equal to 2.0 and Eq. (2) is reduced to Eq. (1). For fully annealed metals, the value of m is about 2.5 [10].
Expanded metal meshes exhibit a diverse range of properties, which makes this material so versatile and suitable for many uses and applications where high rigidity and strength, and lightness, are required. In a search for new materials and possible geometries for energy absorption applications among others, expanded metal sheets appear as a suitable option as found in several international patents [1].
Expanded metal meshes have been used to absorb energy in various applications. In first place, [3] used these meshes as core replacement in sandwich panel structures; [11, 12] proposed their use in steel shear walls used in buildings to absorb seismic energy through shear deformation. [13] investigated their use in protective systems in hurricane situations, where heavy objects may fly due to severe wind conditions. More recently, a series of investigations [14-17] have been conducted describing the failure mechanism of expanded metal meshes under axial crushing. In most cases, this mechanism is characterized by plastic deformation in the bonds connecting the strands of the mesh. More recently, [18] investigated experimentally and numerically the behavior of flattened expanded metal tubes. It was found through a numerical analysis that the mechanical properties change from standard to flattened meshes, i.e. an increase in the yield strength for the flattened mesh was demonstrated. In spite of the amount of research projects concerning expanded metal applications, there is little information regarding the mechanical characterization of the meshes. The mechanical properties of expanded metal meshes taking Vickers hardness measurements from strands and bonds were studied in [19, 20], correlating them through regression analysis with yield strengths obtained from tensile tests of specimens subjected to various levels of cold work.
This paper is aimed at obtaining a representative 0.2% offset yield strength on bonds and strands of SEM and FEM meshes from Vickers microhardness measurements using the Tabor's relationship. In addition, the effects of annealing and normalizing heat treatment on the mechanical properties of expanded metal meshes (SEM and FEM) are thoroughly investigated.
Experiments
In this investigation, the expanded metal sheets were made from an ASTM A-569 steel coil. Table 1 shows the chemical analysis of the base material determined experimentally using a spark emission spectrometer model SpectroLabIV.
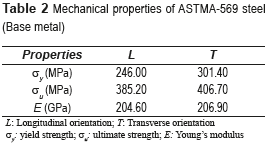
In [19, 20], a preliminary investigation was conducted on the mechanical characterization of expanded metal meshes made of ASTM A-569 steel. Accordingly, table 2 shows the mechanical properties of the base material in as-received condition.
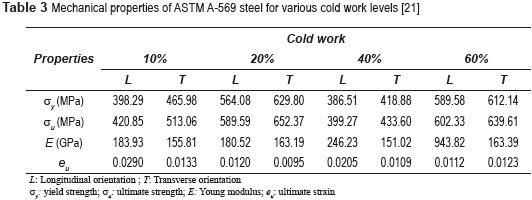
As mentioned above, the base material used to manufacture the expanded metal meshes undergoes large plastic deformations. Therefore, it is convenient to know the mechanical properties of the ASTM A‑569 steel under different cold work conditions. Later, [21] performed an investigation on the influence of cold working and heat treatment on the mechanical properties of ASTM A-569 steel sheets; their results regarding cold working are reported in table 3.
Standard and flattened expanded metal meshes were analyzed herein. Table 4 shows their dimensions and technical specifications.
In the experimental campaign, 34 specimens were studied to investigate the influence of the heat treatments on the mechanical properties of the meshes. For each type of mesh, SEM and FEM, eight specimens were annealed and eight additional were normalized. Additionally, one sample in as-received condition was used for reference. The temperature for both treatments was 950°C, and the exposure time was different for each sample, ranging from 15 minutes to 120 minutes in 15 minutes steps. The purpose of applying annealing and normalizing with different exposure times was to cause differences in the grain size of the specimens. An Electric Resistance Furnace JH®, model HET. 80, was used for the heat treatments. The inside temperature of the furnace was controlled at every moment during the early stages of heating.
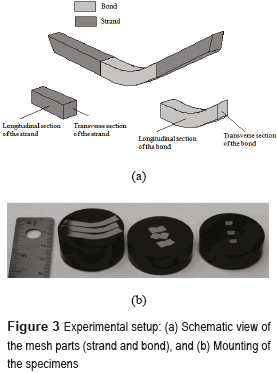
Prior to mechanical testing, the specimens were metallographic prepared according to the ASTM E3-11 Standard [22]. The strands and nodes from standard and flattened meshes were cut, and mounted in polymeric resin (red bakelite powder, see Figure 3).
A last polishing step was carried out with 0.05 μm alumina suspension, and then attacked with Nital at 5%. This procedure also eliminates the surface impurities, which are formed because of the exposure to the environment. The specimens were prepared using a Struers electro-hydraulic mounting press, model LaboPress-3.
Mechanical characterization through Vickers microhardness measurements on strands and bonds was conducted in both longitudinal and transverse directions, as shown in figure 3. Measurements were performed at room temperature according to Standards ASTM E384-99 [23] and ASTM E140-02 [24]. A Buehler microdurometer, model Indentamet 1100, operating with a load of 200 g and an indentation time of 15 s was employed. A matrix pattern of 15x5 indentations on each direction (longitudinal and transverse) was performed, totaling 150 measurements on each analyzed specimen.
Results and discussion
Vickers microhardness test results
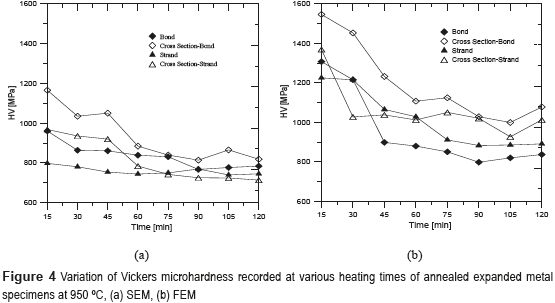
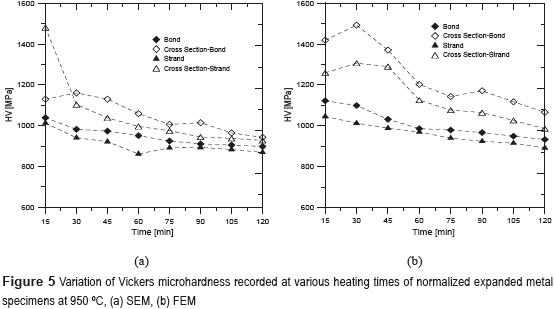
Experimental results for the specimens in as-received condition are shown in table 5, and the microhardness measurements for the heat-treated specimens are plotted in figures 4 and 5. Table 5 shows a slight increase (between 6.67% and 13.82%) in microhardness values from the initial condition of the material (base metal) to the standard condition of the expanded metal. However, from the SEM to the FEM condition, the increase in microhardness values is more significant for both, as-received and heat-treated specimens, as seen in table 5 and figures 4 and 5.
The average increase in microhardness values on bonds and strands ranged from 12.62% to 14.57% for the as-received condition specimens, from 18.45% to 33.46% for the annealed specimens, and from 5.72% to 9.94% for the normalized specimens. This behavior, as mentioned above, is attributed to the severe plastic deformation that the material undergoes during the manufacturing process of the expanded metal (SEM and FEM). This gives the material an additional strength and hardness with respect to its initial state, particularly for the flattened material.
Vickers microhardness measurements presented in table 5 and figures 4 and 5 are an evidence of the complexity of the expanded metal meshes. A clear indication of this fact is the difference in the longitudinal section microhardness values between the bonds and strands and their corresponding transverse cross section. For the as-received material, the average increase of the measured values of the cross section of the strands with respect to the longitudinal section is 7.6% for the SEM samples, and 10.4% for FEM samples. Similarly, the corresponding values for the bonds are 11.2% for the SEM specimens and 14.0% for the FEM specimens. This trend can also be observed in figures 4 and 5 for the heat-treated samples.
These differences in microhardness values are caused by a change in the direction of the dislocations movement, which can be associated with the Bauschinger effect, modifying the direction of deformation and causing some degree of heterogeneity and anisotropy in the mesh.
Figure 4(a) depicts an average decrease of microhardness values (from t=15 min to t=120 min) on bond, bond cross-section, strand and strand cross-section for the annealed SEM specimens of 22.47%, 42.33%, 7.05% and 35.66%, respectively. Correspondingly, for the normalized SEM specimens (Figure 5a) the average decrease was of 15.73%, 43.51%, 16.54% and 59.63%. The average decrease in microhardness values on the sections previously mentioned for the annealed FEM specimens (Figure 4b) was of 36.46%, 44.85%, 56.25% and 26,04%, while for the normalized FEM specimens (Figure 5b) the average decrease was recorded in 20.32%, 33.10%, 17.32% and 27.75%, respectively.
Results show that the microhardness values have a significant variation on the considered sections during the different stages of heating. Finally, it is worth noticing that the normalized specimens (Figure 5) achieve higher levels of hardness compared to the annealed specimens (Figure 4). This variation in hardness values is due to the higher cooling rate, which in low carbon steels reduces the space between ferrite and cementite plates, increasing hardness.
Yield strength estimation
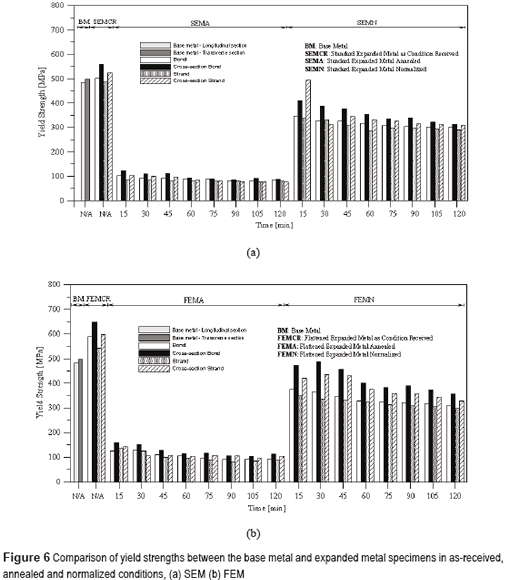
Yield strength for the specimens in as-received condition were estimated from the Vickers microhardness values found in table 5, using Eq. (2), and are presented in table 6. Following the same procedure, the yield strength of the samples for the base metal, the annealed and normalized conditions were calculated using the microhardness values shown in figures 4 and 5, and presented in figure 6.
The comparison of the results in table 6 with those in table 3, obtained by [21], shows that there is a good agreement between the yield strength estimated through the Vickers microhardness measurements and the yield strength obtained through standard tension tests, for the various levels of cold work. These results confirm that the method herein implemented is reliable and that the estimated values of yield strength for the heat-treated meshes are consistent.
Figure 6 shows a complete view of the dependence of the yield strength on the type of heat treatment, heating times, location (strand or bond), direction (longitudinal or transversal), and manufacturing process of the meshes. As expected, the changes in the material hardness are reflected as a significant variation of the yield strength values, from that of the initial condition of the base material to those of the SEM and FEM meshes.
Regarding heat treatments, even 15 minutes of annealing or normalizing at 950 °C produce a steep decline of the yield strength compared to the as-received condition, this effect being more pronounced with the former than with the later. Furthermore, additional heating time leads to smaller reductions of the yield strength compared to the first 15 minutes of heat treatment. Another noticeable fact is that the heterogeneity and anisotropy, i.e. the relative magnitude of the yield strength between locations (higher in the bonds than in the strands), and between directions (higher in the cross sections than in the longitudinal sections), is maintained after the application of the first heat stages. However, as the heating time is increased these differences are reduced, and this effect is more pronounced for annealing than for normalizing. Specifically, after 120 minutes of heat treatment, the four yield strengths for the annealed SEM mesh (Figure 6a) are almost the same, about 81 MPa. It can be seen in figure 6b that at the same heat stage, the annealed FEM mesh still maintains significant strength heterogeneity and anisotropy. However, it is expected that by giving enough heating time, even the normalized meshes will become homogeneous and isotropic.
Conclusions
From the experimental study presented herein, the following conclusions can be drawn:
It was found that the estimated yield strength values of bonds and strands of expanded ASTM A-569 steel meshes, based on Vickers microhardness measurements and the Tabor's equation, are consistent with those obtained through standard mechanical testing of the base material subjected to various levels of cold working.
Differences in mechanical properties, namely the yield strength and Vickers microhardness, reflect the heterogeneity and anisotropy induced by the manufacturing process of the expanded meshes. On one hand, the values of these properties on bonds are higher than those on the strands. This relationship also applies when comparing cross sections and longitudinal sections. On the other hand, results obtained from the various heat-treated specimens evidence that short heating times do not affect the aforementioned complexity, and that it is required, for the SEM mesh, at least two hours of annealing to mitigate the effects of the cold work produced by the manufacturing process, leading to a quasi-homogeneous and isotropic condition.
Comparisons between meshes analyzed indicate that the yield strength and Vickers microhardness of FEM meshes are greater in comparison to SEM meshes and both properties increase considerably with the cold work.
Furthermore, higher values of these properties were registered on the transverse cross-section of specimens compared to the corresponding longitudinal measurements.
Acknowledgment
The authors gratefully acknowledge the support of the Laboratory of Material Sciences and the Technology Research Center (CITEC) of the Universidad Francisco de Miranda, Universidad de Carabobo, INCES-Falcón, and the Universidad Simón Bolívar for this study.
References
1. D. Smith, C. Graciano, G. Martínez. ''Recent patents on expanded metal''. Recent Patents on Materials Science. Vol. 2. 2009. pp. 209-225. [ Links ]
2. National Association of Architectural Metal Manufacturers (NAAM). Standards for expanded metal. Standard EMMA 557-12. Illinois, USA. 2012. pp. 1-16. Available on: https://www.naamm.org/landing_pages/EMMA%20557-12.pdf Accessed: October 5, 2013. [ Links ]
3. G. Kooistra, H. Wadley. ''Lattice truss structures from expanded metal sheet''. Materials and Design. Vol. 5. 2005. pp. 507-514. [ Links ]
4. D. Tabor. ''A simple theory of static and dynamic hardness''. Proc. R. Soc. A. Vol. 192. 1947. pp. 247-274. [ Links ]
5. J. Nobre, A. Dias, M. Kornmeier. ''An empirical methodology to estimate a local yield stress in work-hardened surface layers''. Exp. Mech. Vol. 1. 2004. pp. 76-84. [ Links ]
6. B. Yavuz, A. Tekkaya. Correlation between Vickers hardness number and yield stress of cold formed products. Report N.° AFP-98-03-02-03. Sponsored by METU Graduate School of Natural and Applied Science. Middle East Technical University. Ankara, Turkey. 2000. pp. 1-10. [ Links ]
7. D. Tabor. ''The hardness and strength of metals''. J. I. Metals. Vol. 79. 1951. pp. 1-18. [ Links ]
8. R. George, S. Dinda, A. Kasper. ''Estimating yield strength from hardness data''. Metal Progress. Vol. 109. 1976. pp. 30-35. [ Links ]
9. J. Cahoon, W. Broughton, A. Kutzak. ''The determination of yield strength from hardness measurement''. Metallurgical Transactions. Vol. 2. 1971. pp. 1979-1983. [ Links ]
10. G. Dieter. Mechanical Metallurgy. 3rded. Ed. McGraw Hill. New York, USA. 1986. pp. 1-798. [ Links ]
11. P. Dung, A. Plumier. Behaviour of expanded metal panel under shear loading. Proceedings of International Colloquium Stability and Ductility of Steel Structures (SDSS'Rio). Rio de Janeiro, Brazil. 2010. pp. 1101-1108. [ Links ]
12. P. Dung. Seismically retrofitting and upgrading RC-MRF by using expanded metal panels. Doctoral Thesis, University of Liege. Liege, Belgium. 2011. pp. 1-353. [ Links ]
13. M. Rambo, P. Mtenga, K. Walsh. ''Missile impact resistance of a metal mesh roofing system''. Journal of Architectural Engineering ASCE. Vol. 18. 2011. pp. 199-205. [ Links ]
14. C. Graciano, G. Martínez, D. Smith. ''Experimental investigation on the axial collapse of expanded metal tubes''. Thin-Walled Structures. Vol. 47. 2009. pp. 953-961. [ Links ]
15. C. Graciano, G. Martínez, A. Gutiérrez. ''Failure mechanism of expanded metal tubes under axial crushing''. Thin-Walled Structures. Vol. 51. 2012. pp. 20-24. [ Links ]
16. G. Martínez, C. Graciano, P. Teixeira. ''Energy absorption of axially crushed expanded metal tubes''. Thin-Walled Structures. Vol. 71. 2013. pp. 134-146. [ Links ]
17. D. Smith, C. Graciano, G. Martínez. ''Quasi-static axial compression of concentric expanded metal tubes''. Thin-Walled Structures. Vol. 84. 2014. pp. 170-176. [ Links ]
18. D. Smith, C. Graciano, G. Martínez, P Teixeira. ''Axial crushing of flattened expanded metal tubes''. Thin-Walled Structures. Vol. 85. 2014. pp. 42-49. [ Links ]
19. R. Sánchez. Determinación de las propiedades mecánicas de láminas de metal expandido. Master Thesis, Universidad Simón Bolívar. Caracas, Venezuela. 2005. pp. 1-102. [ Links ]
20. R. Sánchez, C. Graciano. Determinación de las propiedades mecánicas de láminas de metal expandido. Memorias del 7º Congreso Iberoamericano de Ingeniería Mecánica. México D.F., México. 2007. pp. 1-7. [ Links ]
21. G. Aparicio, H. D'Armas. ''Influencia del tratamiento térmico y del trabajo en frío en el comportamiento mecánico de láminas de acero ASTM A-569''. Rev. Ing. UC. Vol. 13. 2006. pp. 43-52. [ Links ]
22. ASTM International.Standard guide for preparation of metallographic specimens. Standard ASTM E3, ASTM International. 2011. West Conshohocken, USA. pp. 1-13. [ Links ]
23. ASTM International.Test Method for Microindentation Hardness of Materials. Standard ASTM E384-99, ASTM International. 1999. West Conshohocken, USA. pp. 1-24. [ Links ]
24. ASTM International.Hardness Conversion Tables for Metals Relationship Among Brinell Hardness, Vickers Hardness, Rockwell Hardness, Superficial Hardness, Knoop Hardness, and Scleroscope Hardness. Standard ASTM E140-02, ASTM International. 2002. West Conshohocken, USA. pp. 1-25. [ Links ]


